GUI tour

A quick tour of the GUI.

A fast walk through BIDS Manager's windows and what each one does, so you can see at a glance how the app fits together.

Want to follow along on real data?

The tutorial takes you through the same workflow step by step, from creating a project to a validated dataset.

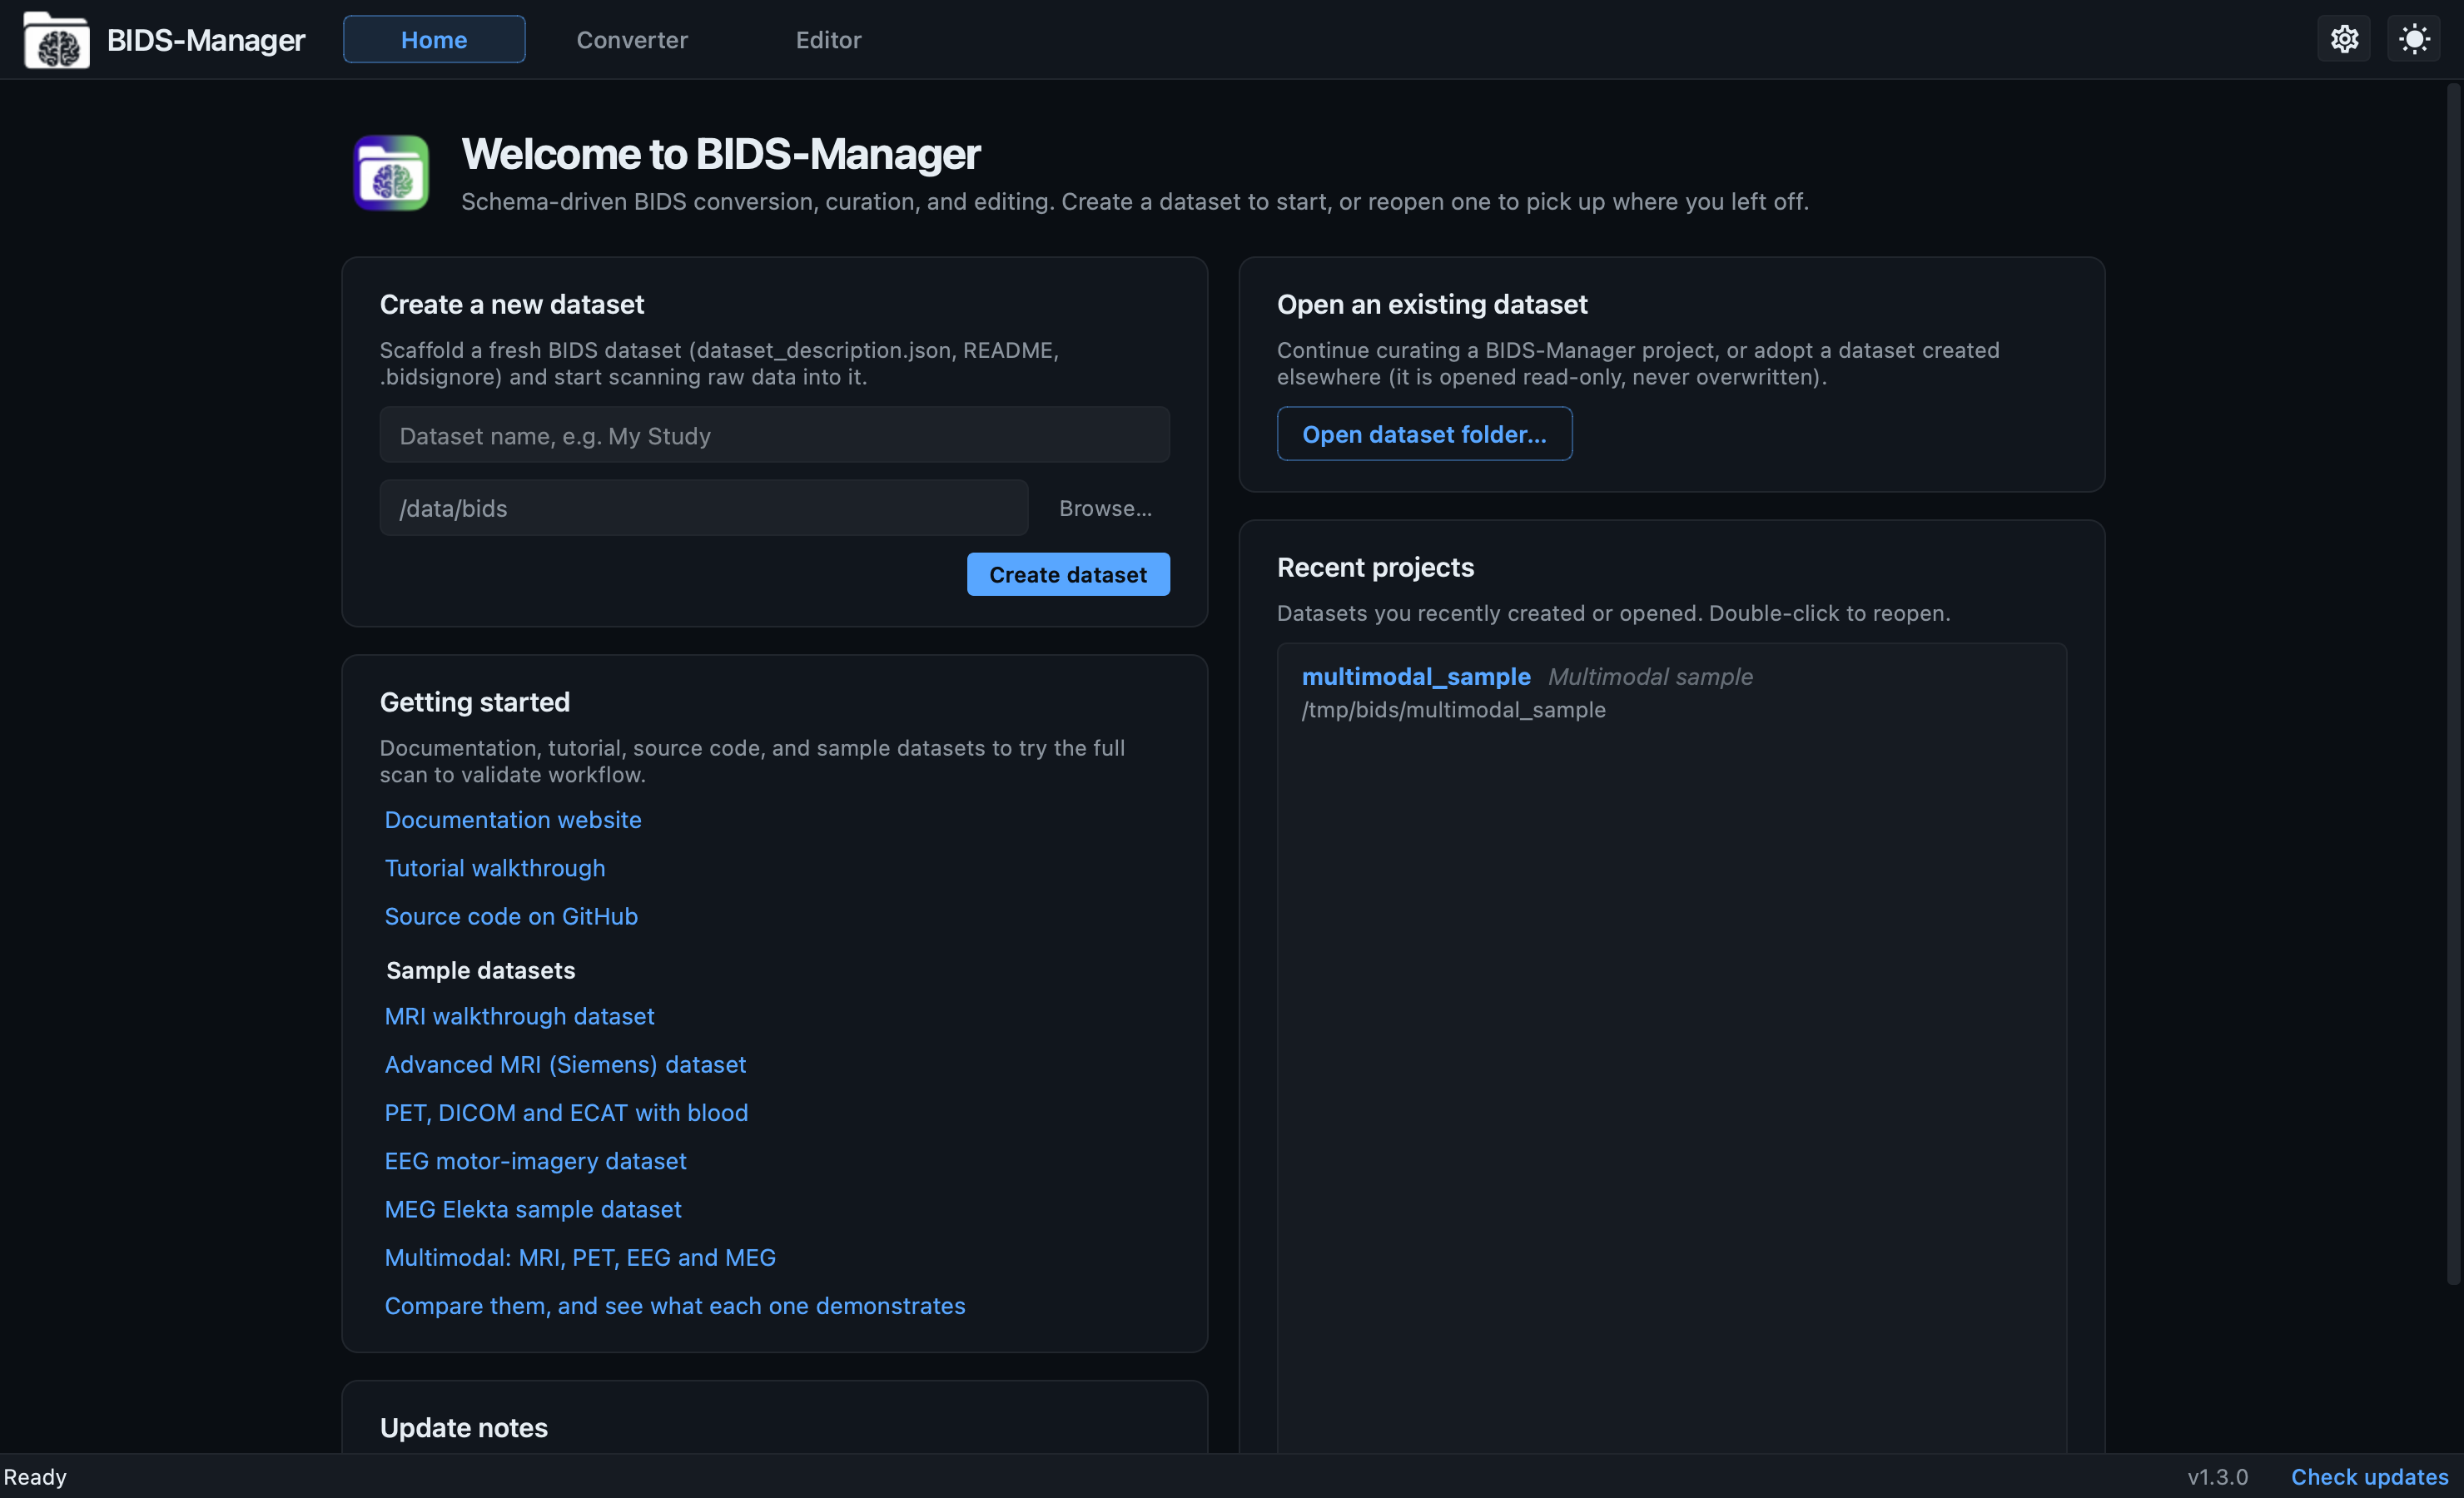
BIDS Manager opens on the Home tab, where you create or open a dataset project, and then gives you two working views: the Converter (raw to BIDS) and the Editor (read, fix, restructure, validate). Click anything on this page to take a closer look, and switch the theme in the header to see it in light or dark.

The three views

Home, Converter, Editor.

BIDS Manager Home tab: create a dataset, open an existing one, recent projects

Home: start or resume a project

BIDS Manager is project-first. Before you scan anything you point it at a dataset folder, and from then on every scan, every edit, and every decision is written into that project. You can quit the app mid-curation and pick up exactly where you left off, and re-running a conversion merges new data in instead of overwriting.

  • Create a new dataset scaffolds a fresh BIDS folder (dataset_description.json, a README, and a .bidsignore) ready to scan raw data into. The folder name becomes the dataset slug.
  • Open an existing dataset continues a BIDS Manager project, or adopts a dataset created elsewhere. Adopted datasets are opened read-only so you can browse and validate them without risk.
  • Recent projects reopen with a double-click (right-click to remove or delete); Getting started links the docs, this tutorial, and the downloadable sample datasets.
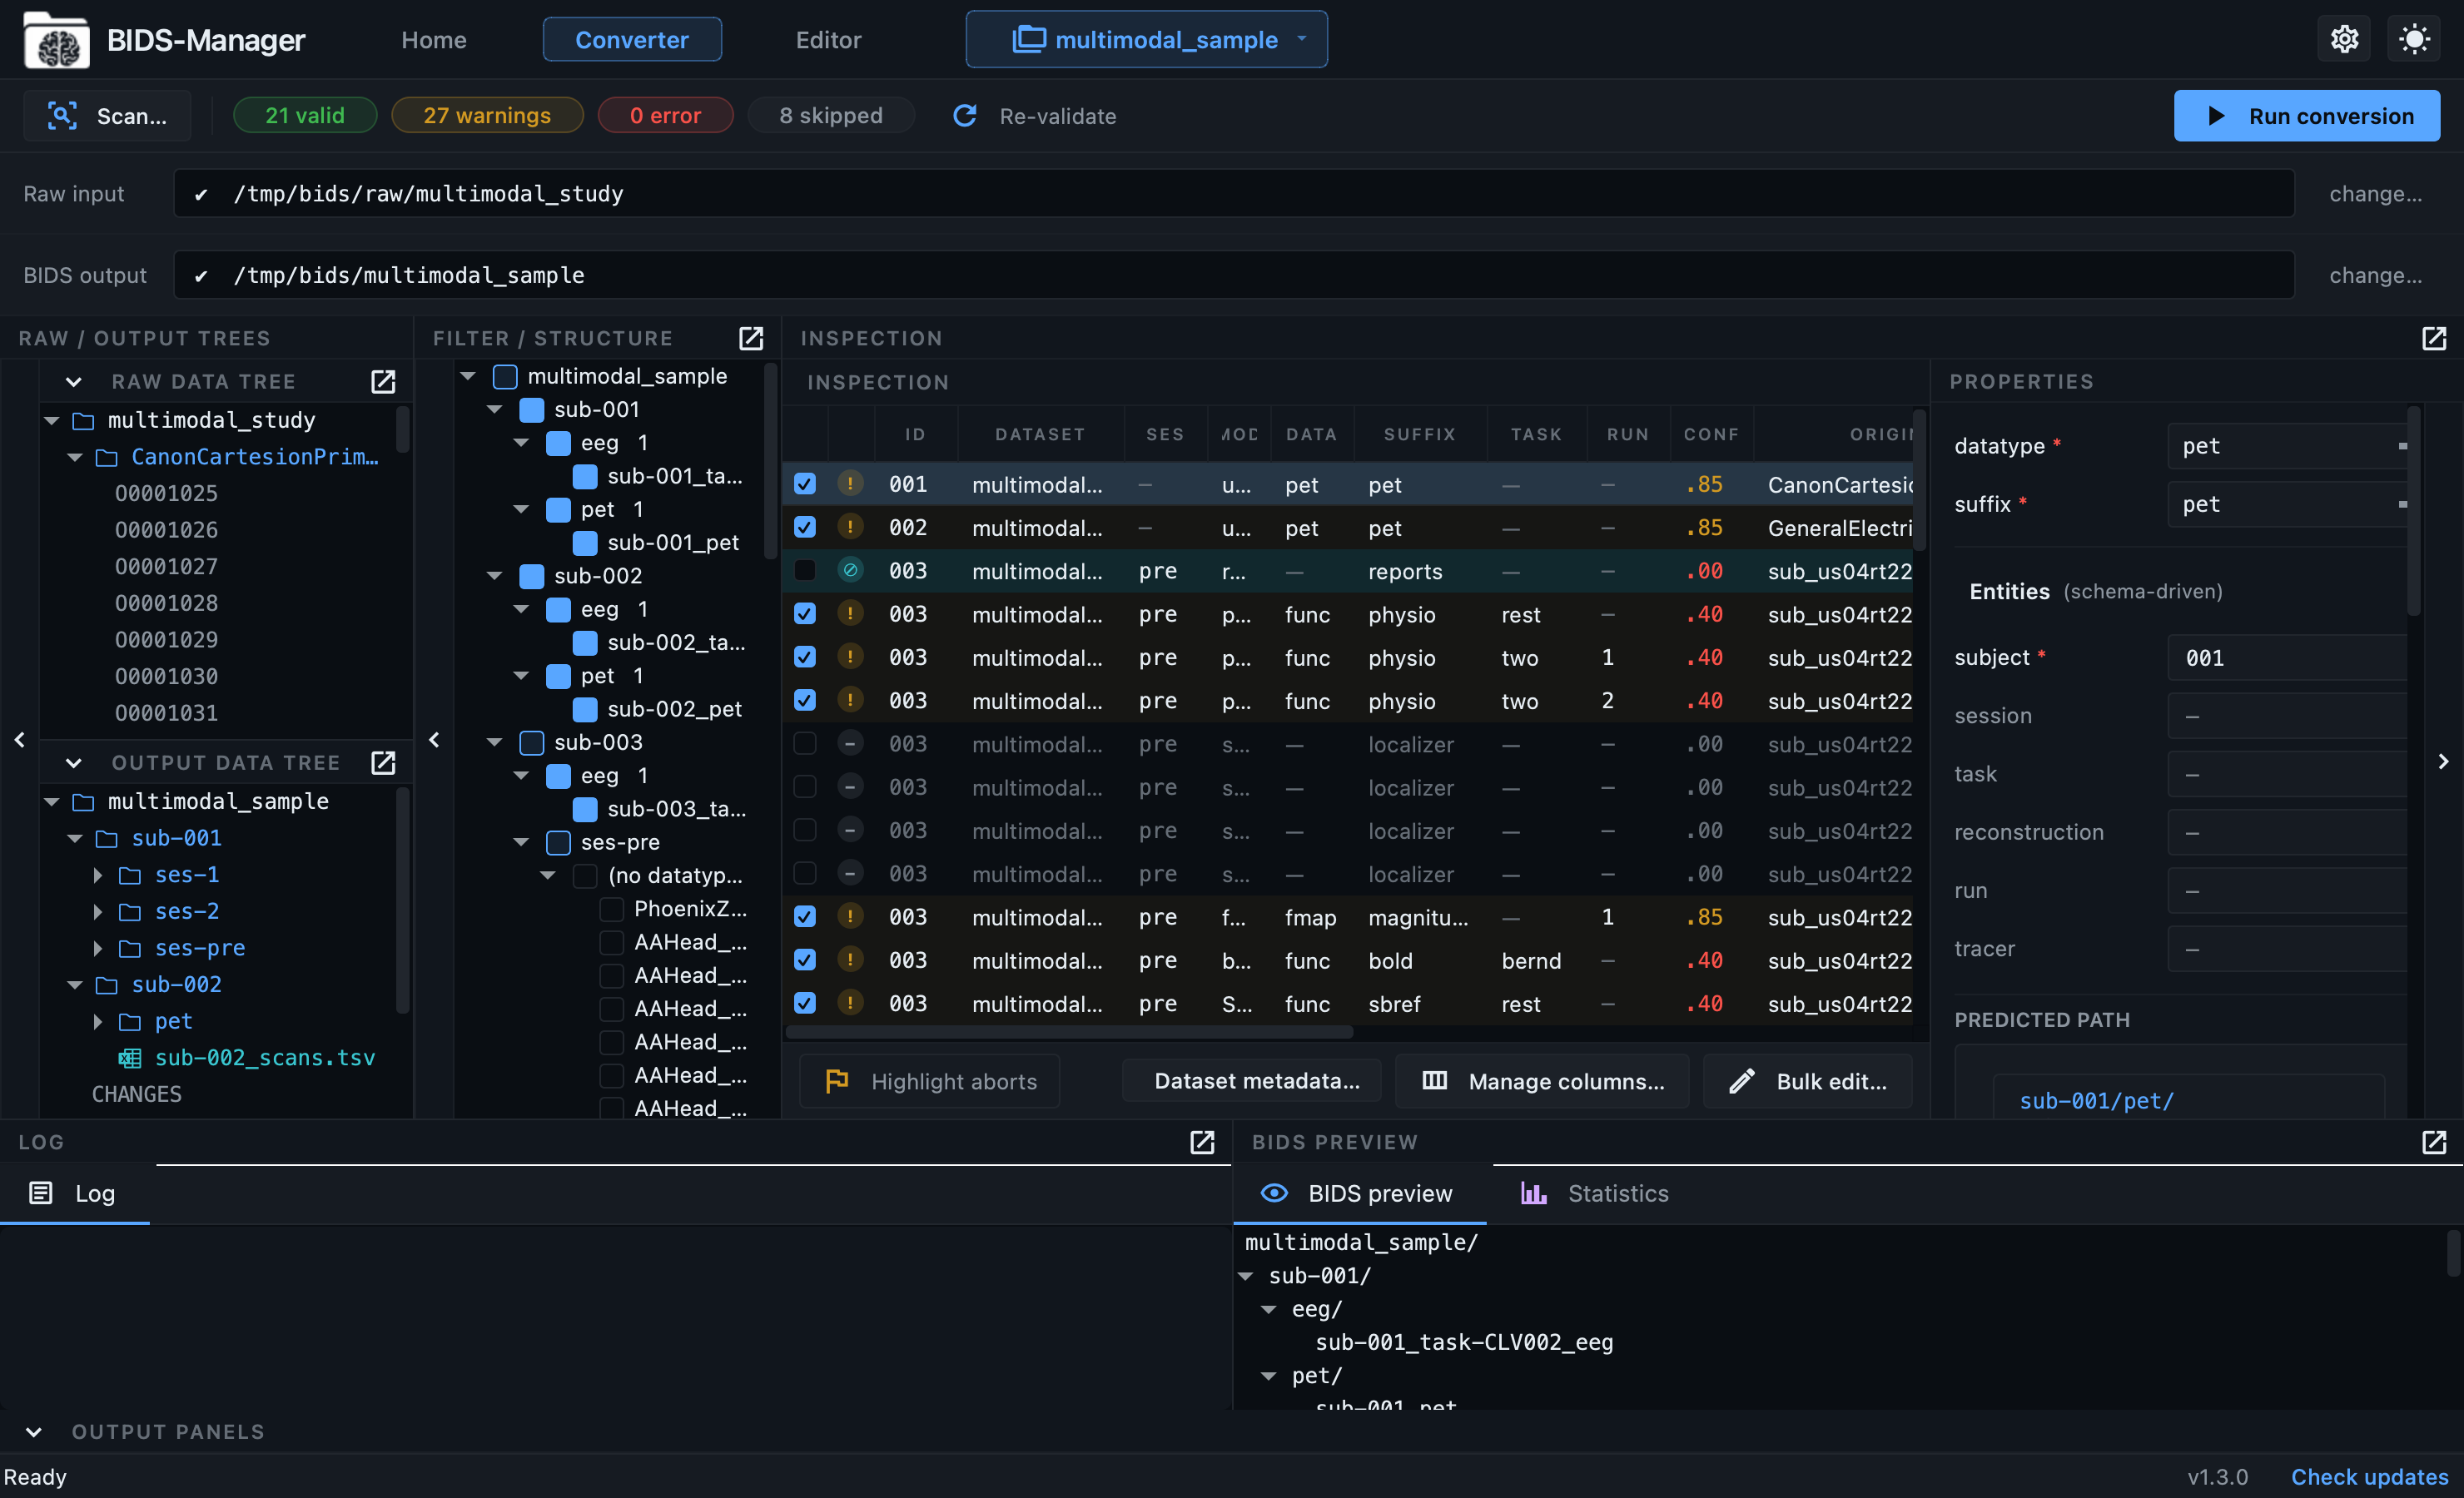
BIDS Manager Converter view: raw and output trees, filter, inspection table, properties

Converter: raw → BIDS

The Converter is where curation happens: you review every recording the scan found, MRI, PET, EEG, MEG and the physiological signals stored inside MRI DICOM files, and decide what becomes BIDS before a single file is written. The top header carries the Scan button, the active-project switcher, Undo / Redo, the live status chips, and Run conversion; two PathBars below show the raw input folder and the project's locked BIDS output.

  • Raw & output trees (left): browse the input folder as it really is on disk, and preview the exact BIDS layout the conversion will produce.
  • Filter / structure: every series grouped by schema entity (subject / session / datatype), so you can filter the table or exclude whole groups at once.
  • Inspection table: the centre of gravity, one editable row per series, colour-coded by status, with Dataset metadata, Manage columns, and Bulk edit beneath it.
  • Properties: a schema-aware editor for the selected row that shows only valid entities and a live predicted path.
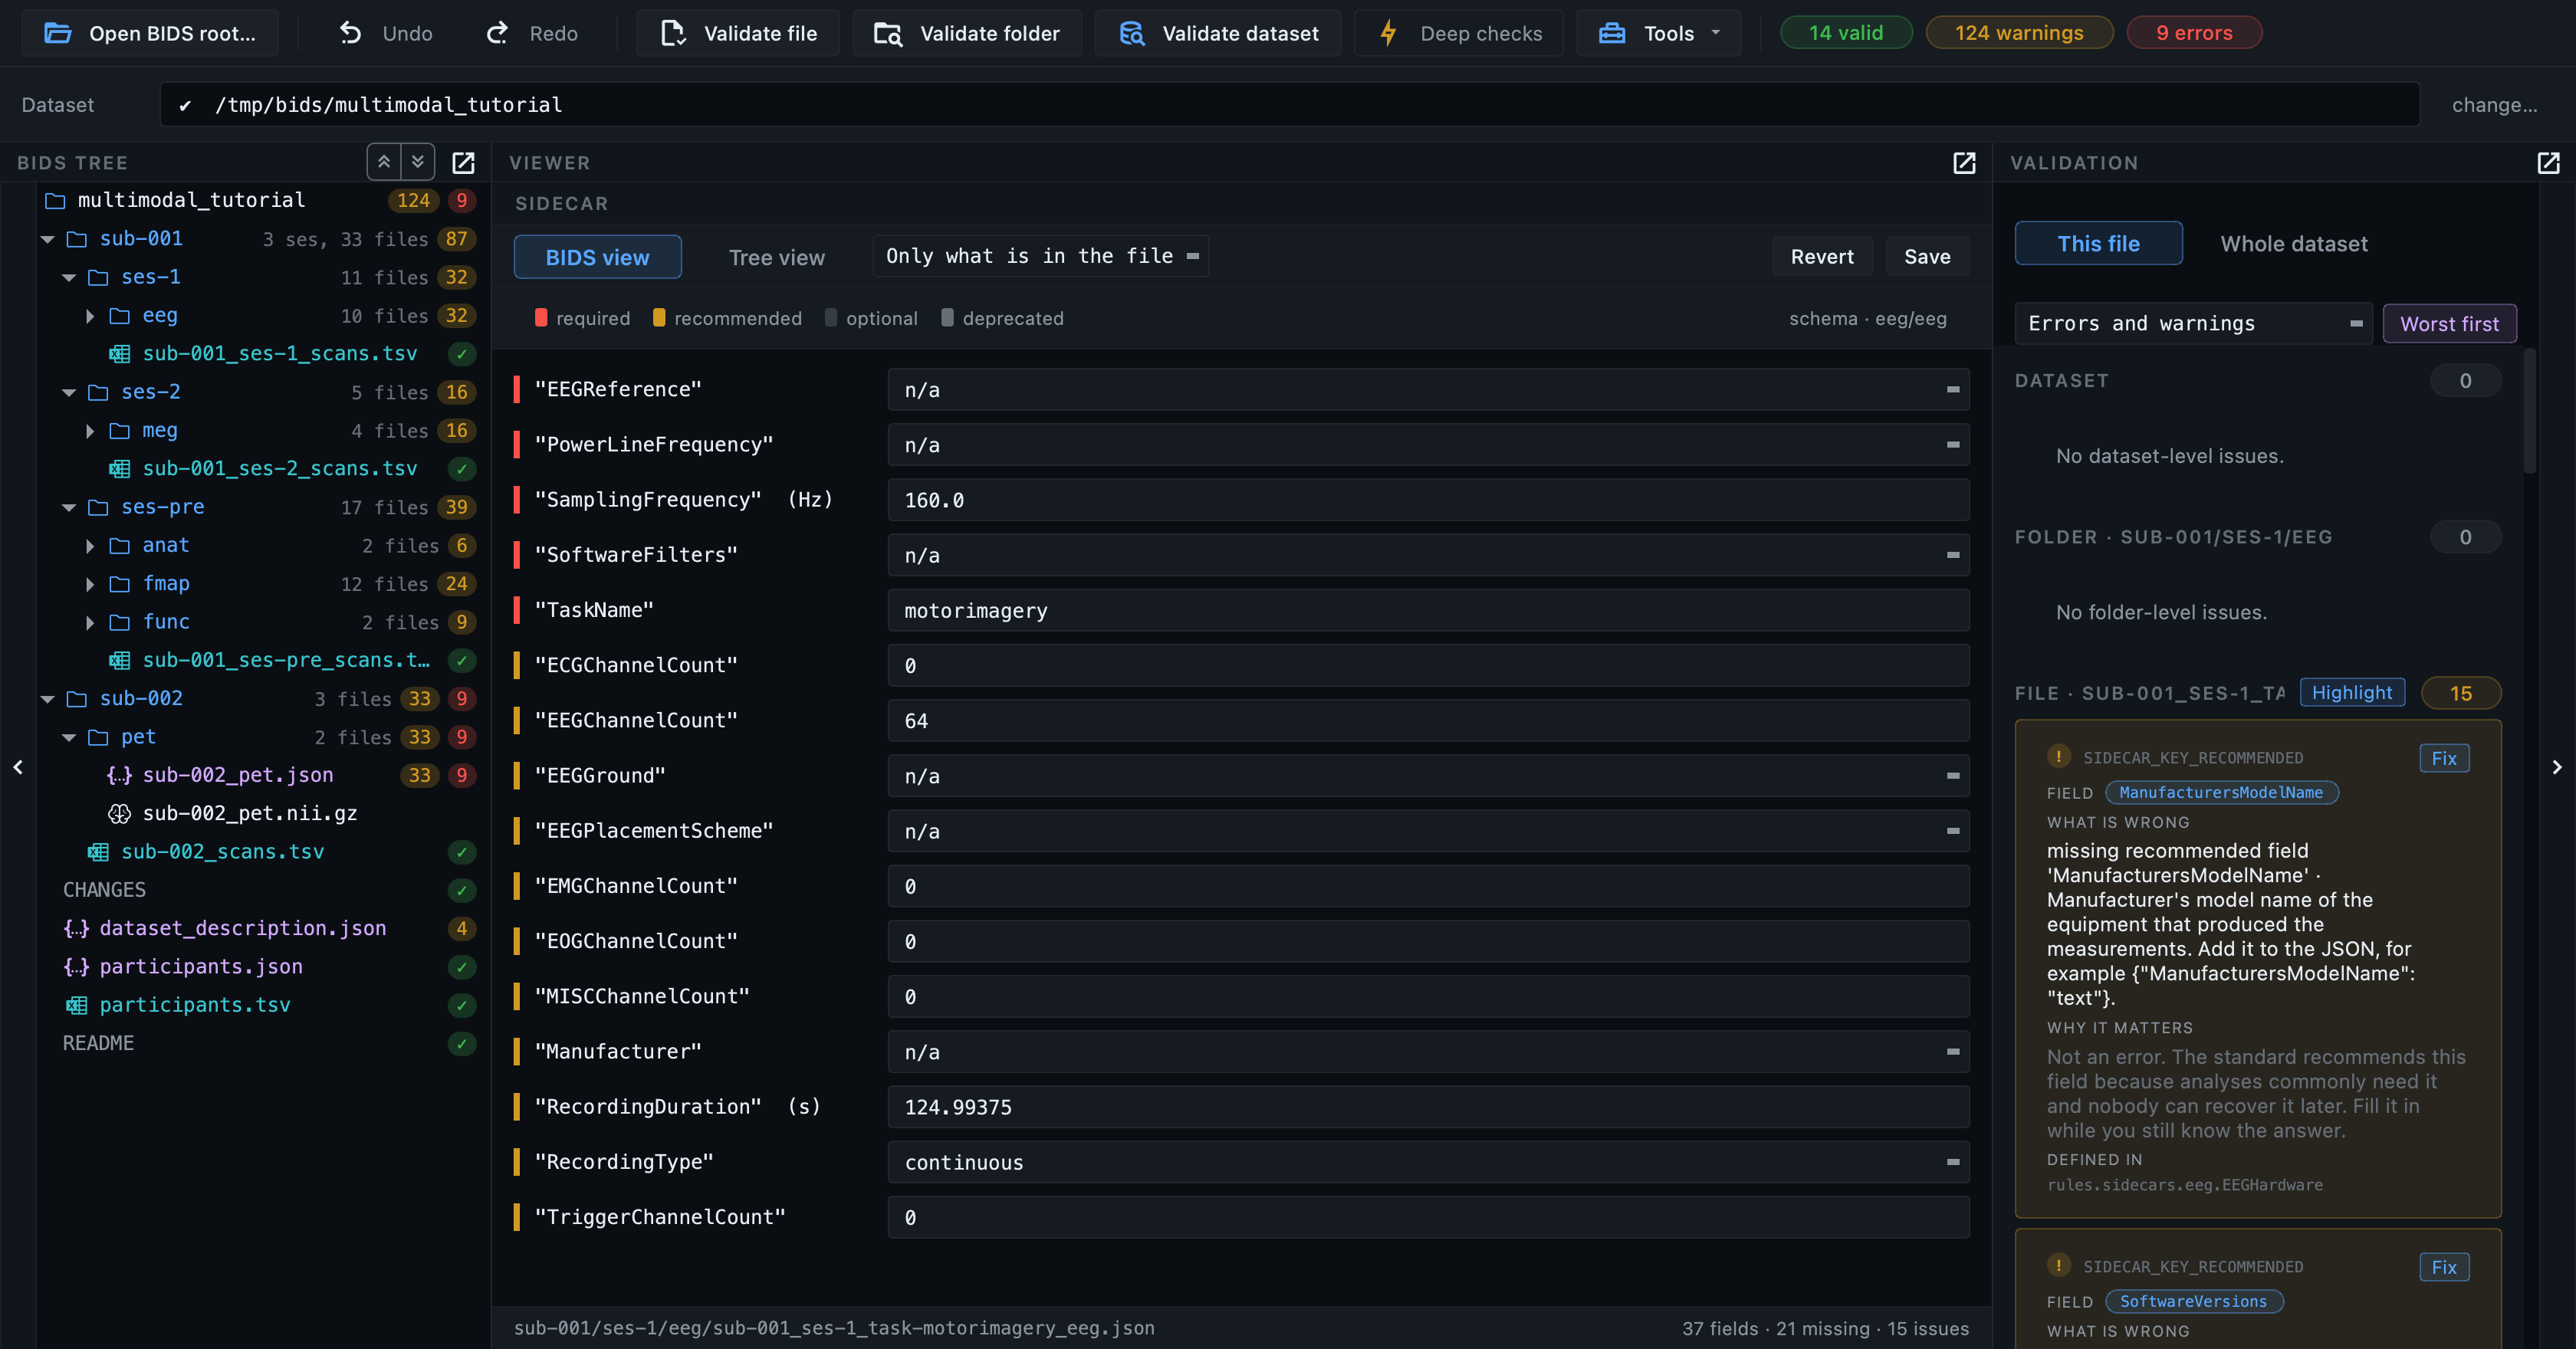
BIDS Manager Editor view: BIDS tree, sidecar form viewer, validation pane

Editor: read, fix, restructure, validate

The Editor opens a dataset for review, repair and restructuring, whether BIDS Manager converted it or not. Its toolbar runs validation at three scopes (single file, folder, or whole dataset), with a Deep checks toggle that also opens NIfTI image headers to catch truncated or corrupt files, and severity chips that summarise the current issues. Every change it makes is undoable.

  • BIDS tree: the layout on disk, with a count of warnings and errors on every row and a green tick where a file is clean. Folders add up what they contain.
  • Centre viewer: routes by file type, a schema-aware form for JSON sidecars, an editable table for TSVs, the Multi-Planar view for NIfTI, and an interactive signal viewer for MEG / EEG recordings.
  • Validation pane: the issue list by severity, with the schema rule each one came from; click an item to jump straight to the file that triggered it, or fix one finding across every file it fired on.
  • Tools: a dashboard of what the dataset contains, dataset-wide repairs, and the actions that change its shape, adding or removing an entity, creating or dissolving a session, and deleting with every reference repaired.
Features in action

From raw files to a validated dataset.

Each part of the workflow, in the order you would reach for it. Click any one to take a closer look.

1. Start a project

Create a new BIDS dataset or open an existing one, then move between open projects from the header.

Create or open a dataset

Create scaffolds a fresh BIDS dataset and starts the project bundle; Open continues a project or adopts an existing dataset. From this point on the BIDS output is locked to the chosen project, so there is no second path to mis-wire.

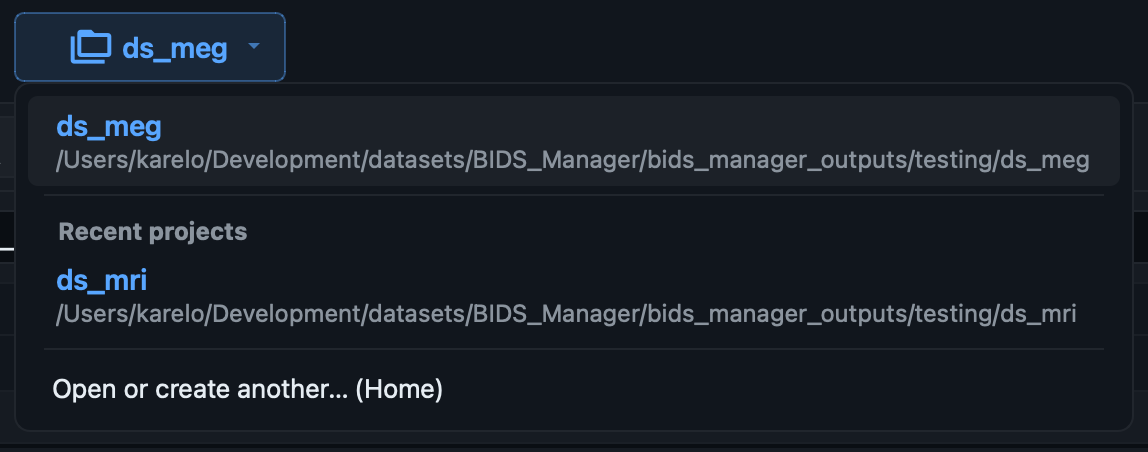
Switch projects from the header

Project switcher dropdown in the header
The active project is shown in the header. The dropdown lists your open and recent projects so you can jump between datasets, or return to the Home tab to open or create another, without losing any work.

2. Scan the raw data

Point at the raw input folder and let the scanner read the metadata inside every file. Teach it your own rules when the defaults miss something.

Point at your raw data

Choose the folder that holds your recordings (DICOM directories, EDF / FIF / BrainVision files, CTF .ds folders, physio logs). The output is already locked to the project, so this one path is all you set.

Scan

The scanner walks the folder and reads metadata from inside every file (DICOM tags, EDF / FIF headers), clusters subjects, groups series, and classifies each one. The status chips (valid / warnings / error / skipped) tick up live, and non-image or unsupported series are flagged and excluded automatically.

Teach the scanner your rules

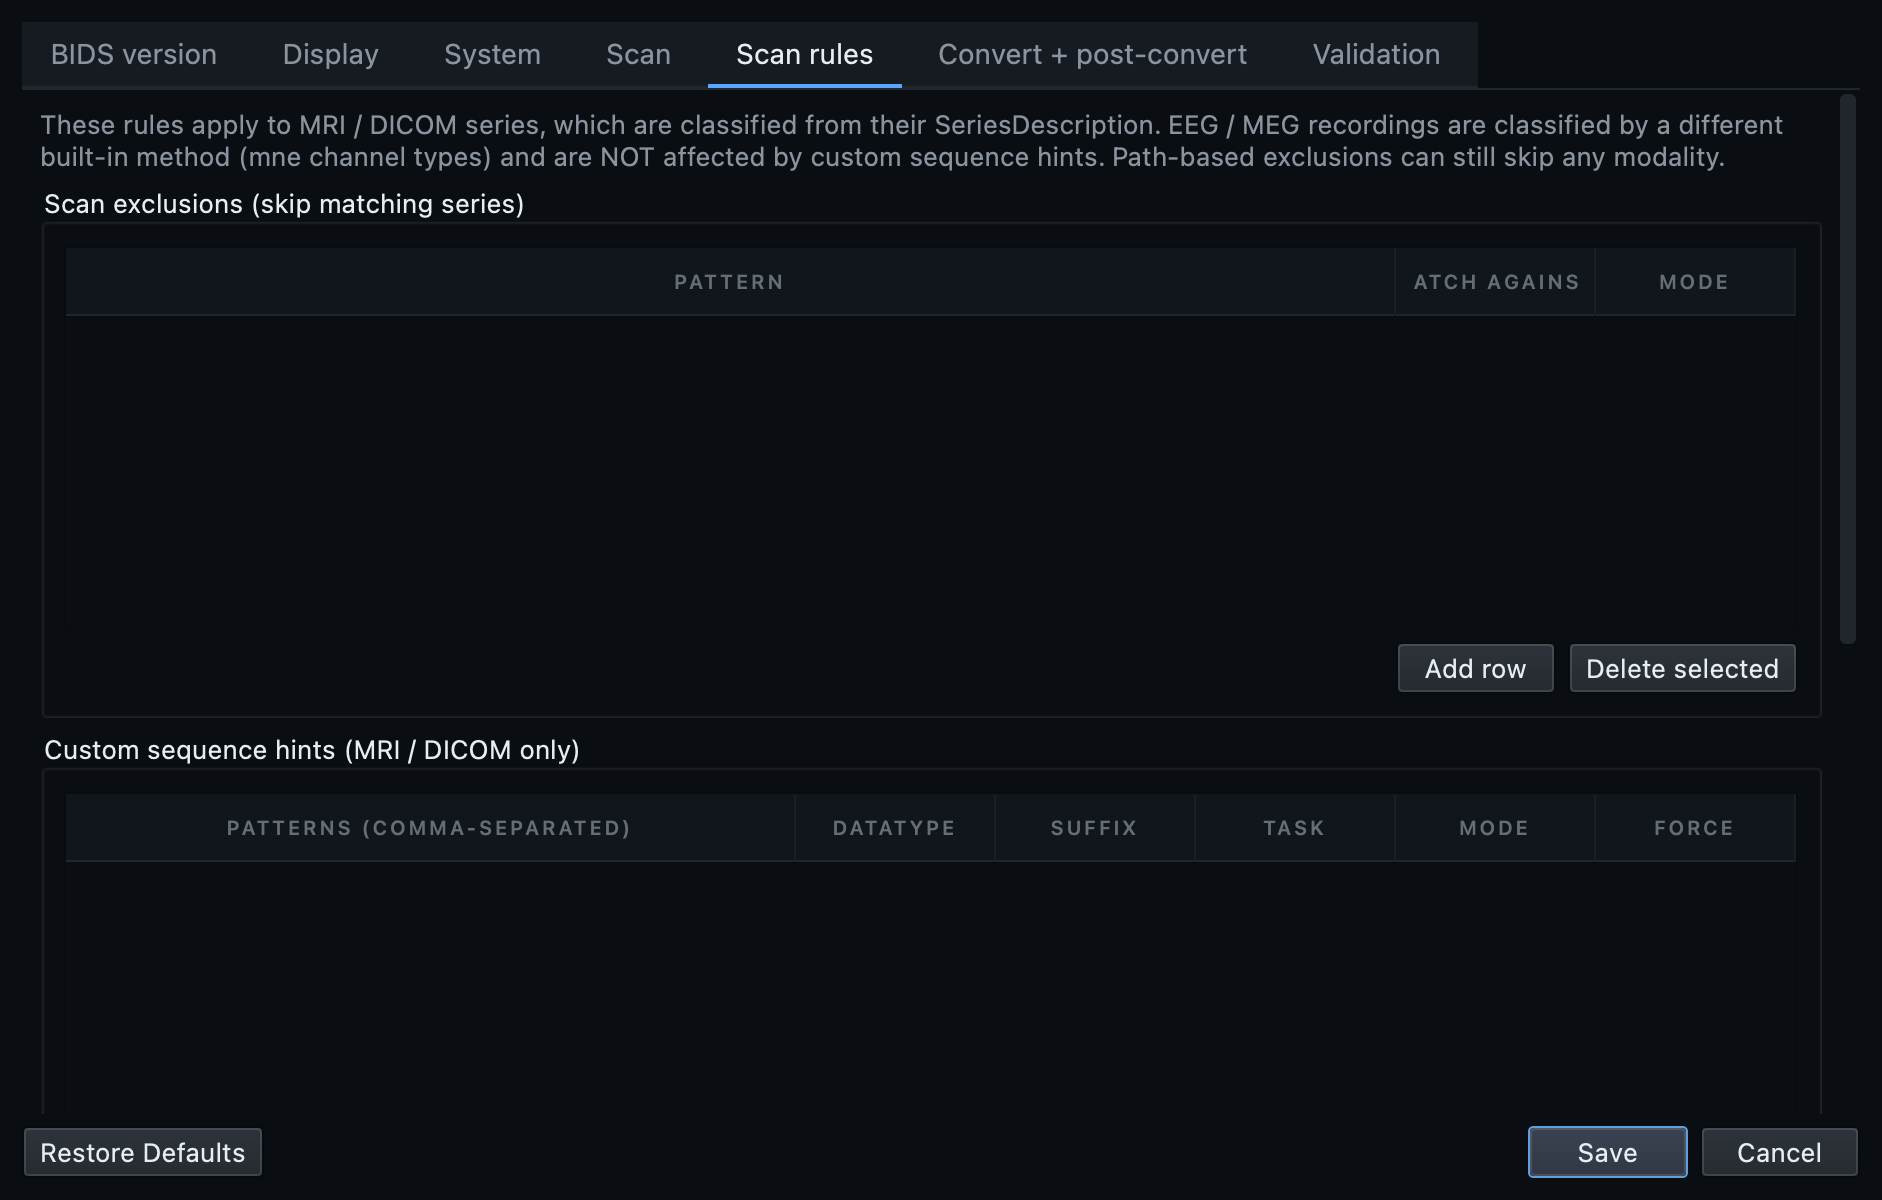
When the classifier misses a local naming convention, the Scan rules settings tab lets you add classifier hints (force a series to a datatype / suffix / task) and series exclusions (drop anything matching a name or path). Rules are schema-constrained, persisted, and the CLI reads the same file via --rules-file.

3. Curate and inspect

Review every conversion decision before anything is written. Filter, bulk-edit, set per-row properties, enrich EEG / MEG metadata, and preview the exact BIDS tree.

Colour-coded inspection

One editable row per series, showing the predicted BIDS basename, datatype, task, run, and the classifier's confidence. Rows are tinted by status, kept, skipped, non-image, or warning, so anything that needs attention stands out immediately.

Filter and structure

A schema-grouped tree of every series, by subject, session, and datatype, with tri-state checkboxes. Filter by entity to focus the table on exactly what you want to review, or untick a whole group to drop it from the conversion.

Bulk edit

Multi-select rows, then set a datatype, task, run, or any other entity on all of them in one action, instead of editing each row by hand. Ideal for relabelling a whole session or task at once.

Manage columns

Show, hide, reorder, and resize the inventory columns to suit the dataset you are curating. Each column carries a description, and your layout is remembered between sessions.

Per-row properties

Select a row and the Properties panel builds a schema-aware editor for it: only the entities valid for that datatype + suffix appear, required fields are marked, and the predicted path updates as you type. EEG / MEG rows also carry minimal recording metadata and per-row device overrides.

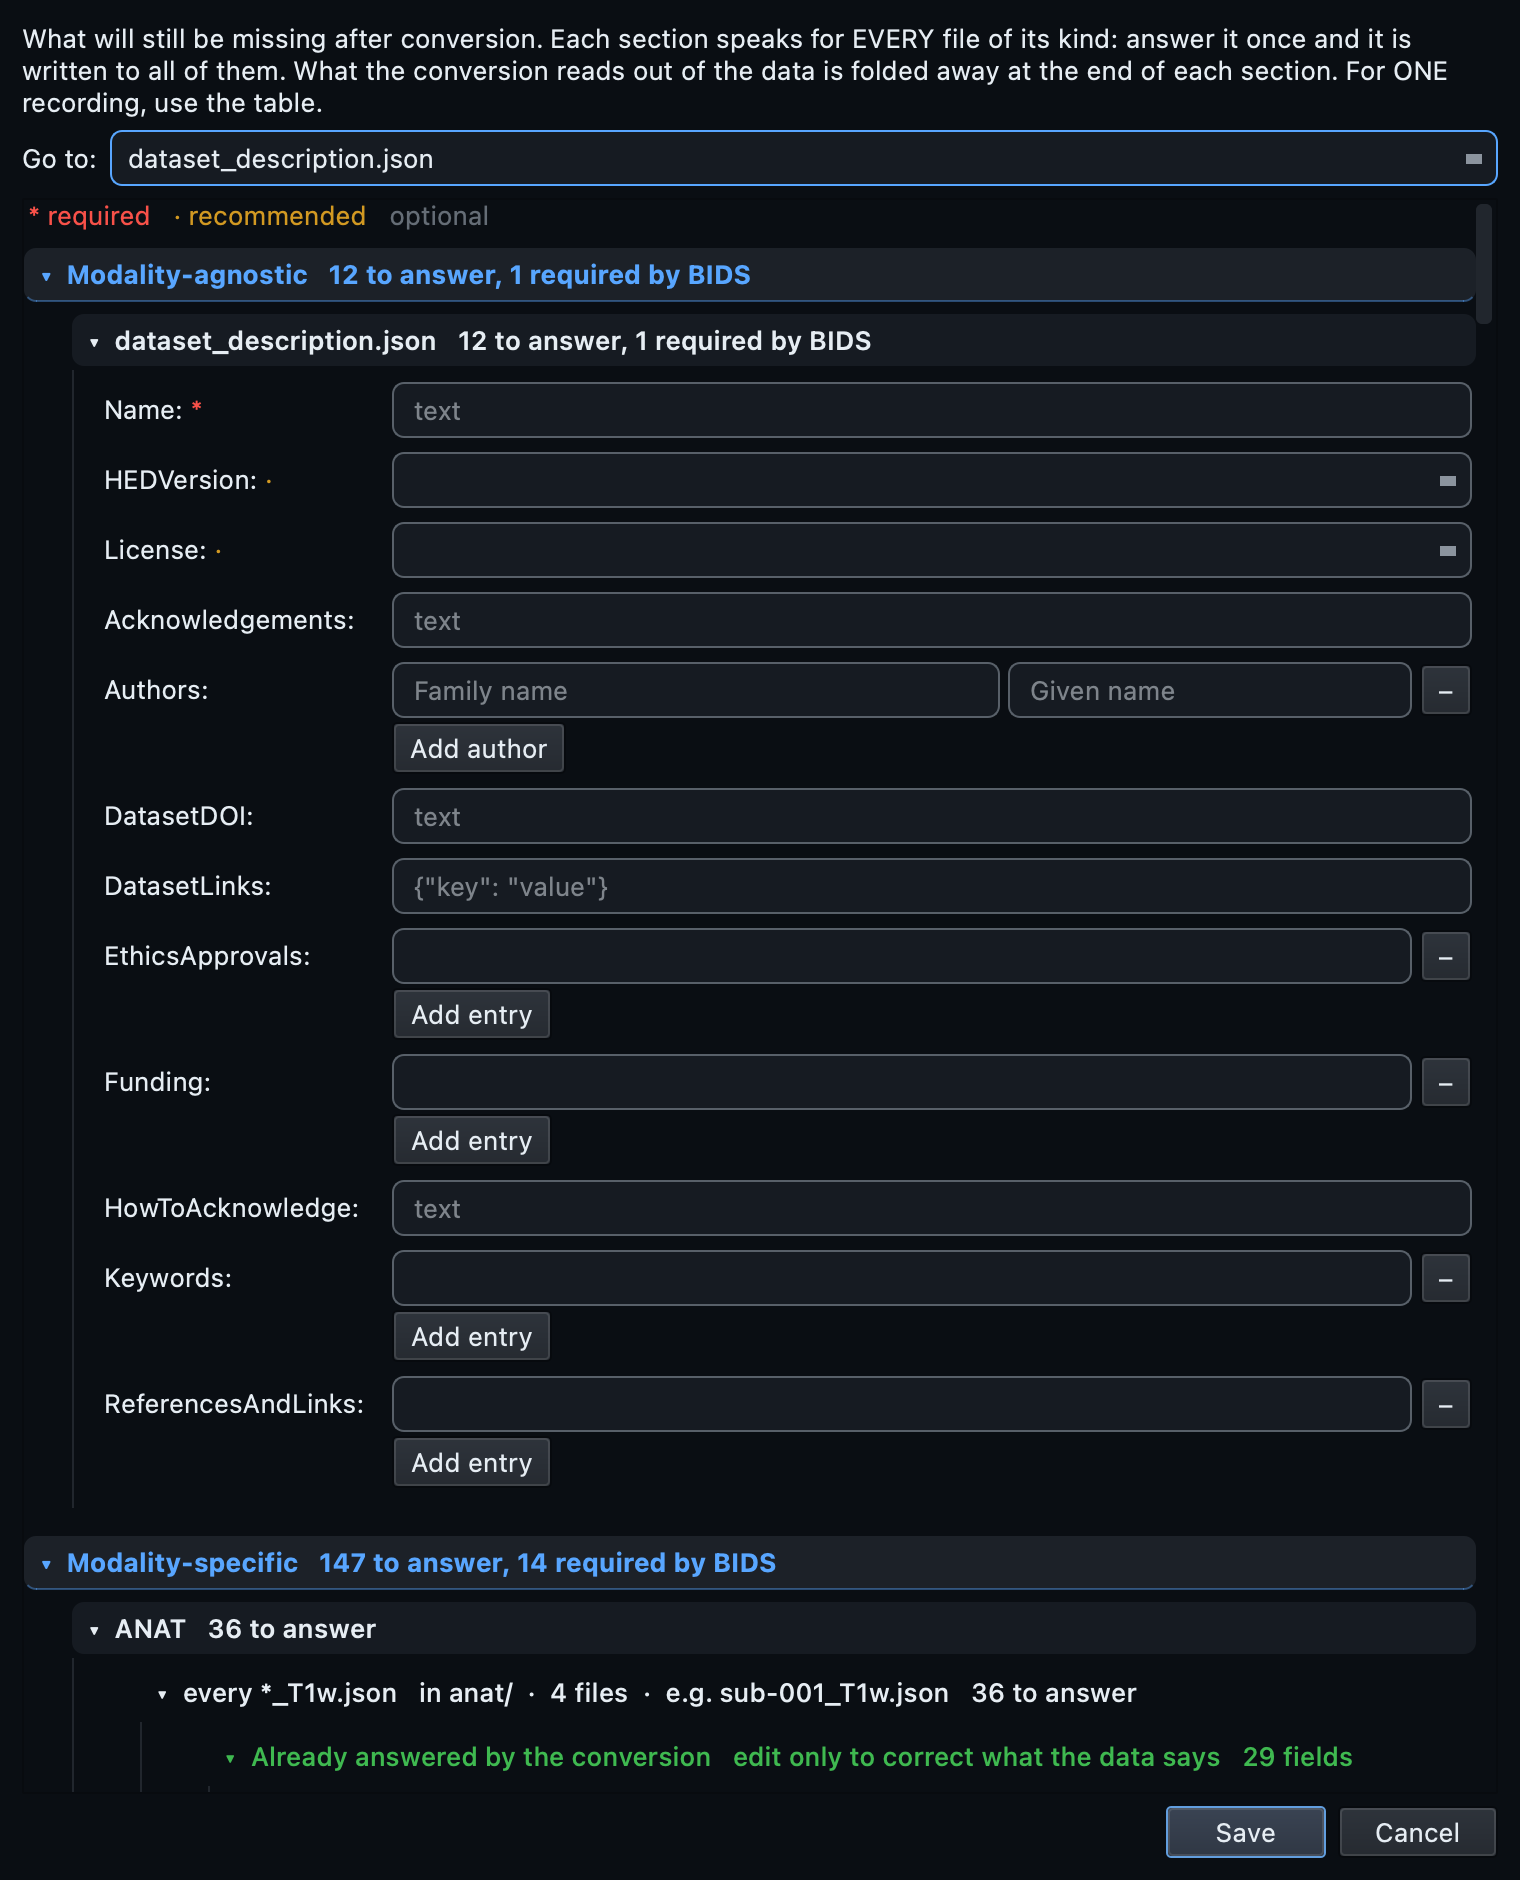
Dataset metadata

The dataset metadata dialog, with the modality-agnostic questions above the modality-specific ones
Answer a dataset-wide question once and the converter writes it into every sidecar it belongs in: reference, ground, hardware filters, device and cap for EEG and MEG; tracer, injected dose, radionuclide and reconstruction for PET; institution and power-line frequency for everything. Fields shared across modalities are separated from the modality-specific ones, and each carries the BIDS schema's own description as a tooltip. Anything answered here can still be overridden for one recording in the properties panel.

Names that would collide

Three inventory rows resolving to one BIDS name shown in red, above two rows separated automatically by run number
Every row's destination filename is worked out before anything is converted. Genuine repeats are given a run number where the standard allows one; where it does not, both basenames turn red and the conversion refuses to start rather than write one recording over the other. Fixing either row clears the red on both, since the state is recomputed from the table as it stands.

Preview the BIDS tree

The bottom dock previews the exact filesystem layout the conversion will produce, file names, folders, and sidecars, so you can confirm everything looks right before a single byte is written.

4. Convert

Run the right backend per modality, with conversion and the post-conversion chain configurable in Settings.

Run the conversion

Each row is dispatched to the right backend: dcm2niix for DICOM, including PET DICOM, mne-bids for EEG, MEG and pet2bids for PET ECAT files and blood curves, and bidsphysio for the physiological signals stored inside Siemens MRI DICOM. You do not pick the engine; the row's format does. Subjects stage in a private temp tree and commit atomically; the Log dock streams every line, and re-runs merge new data in safely.

What happens after the conversion
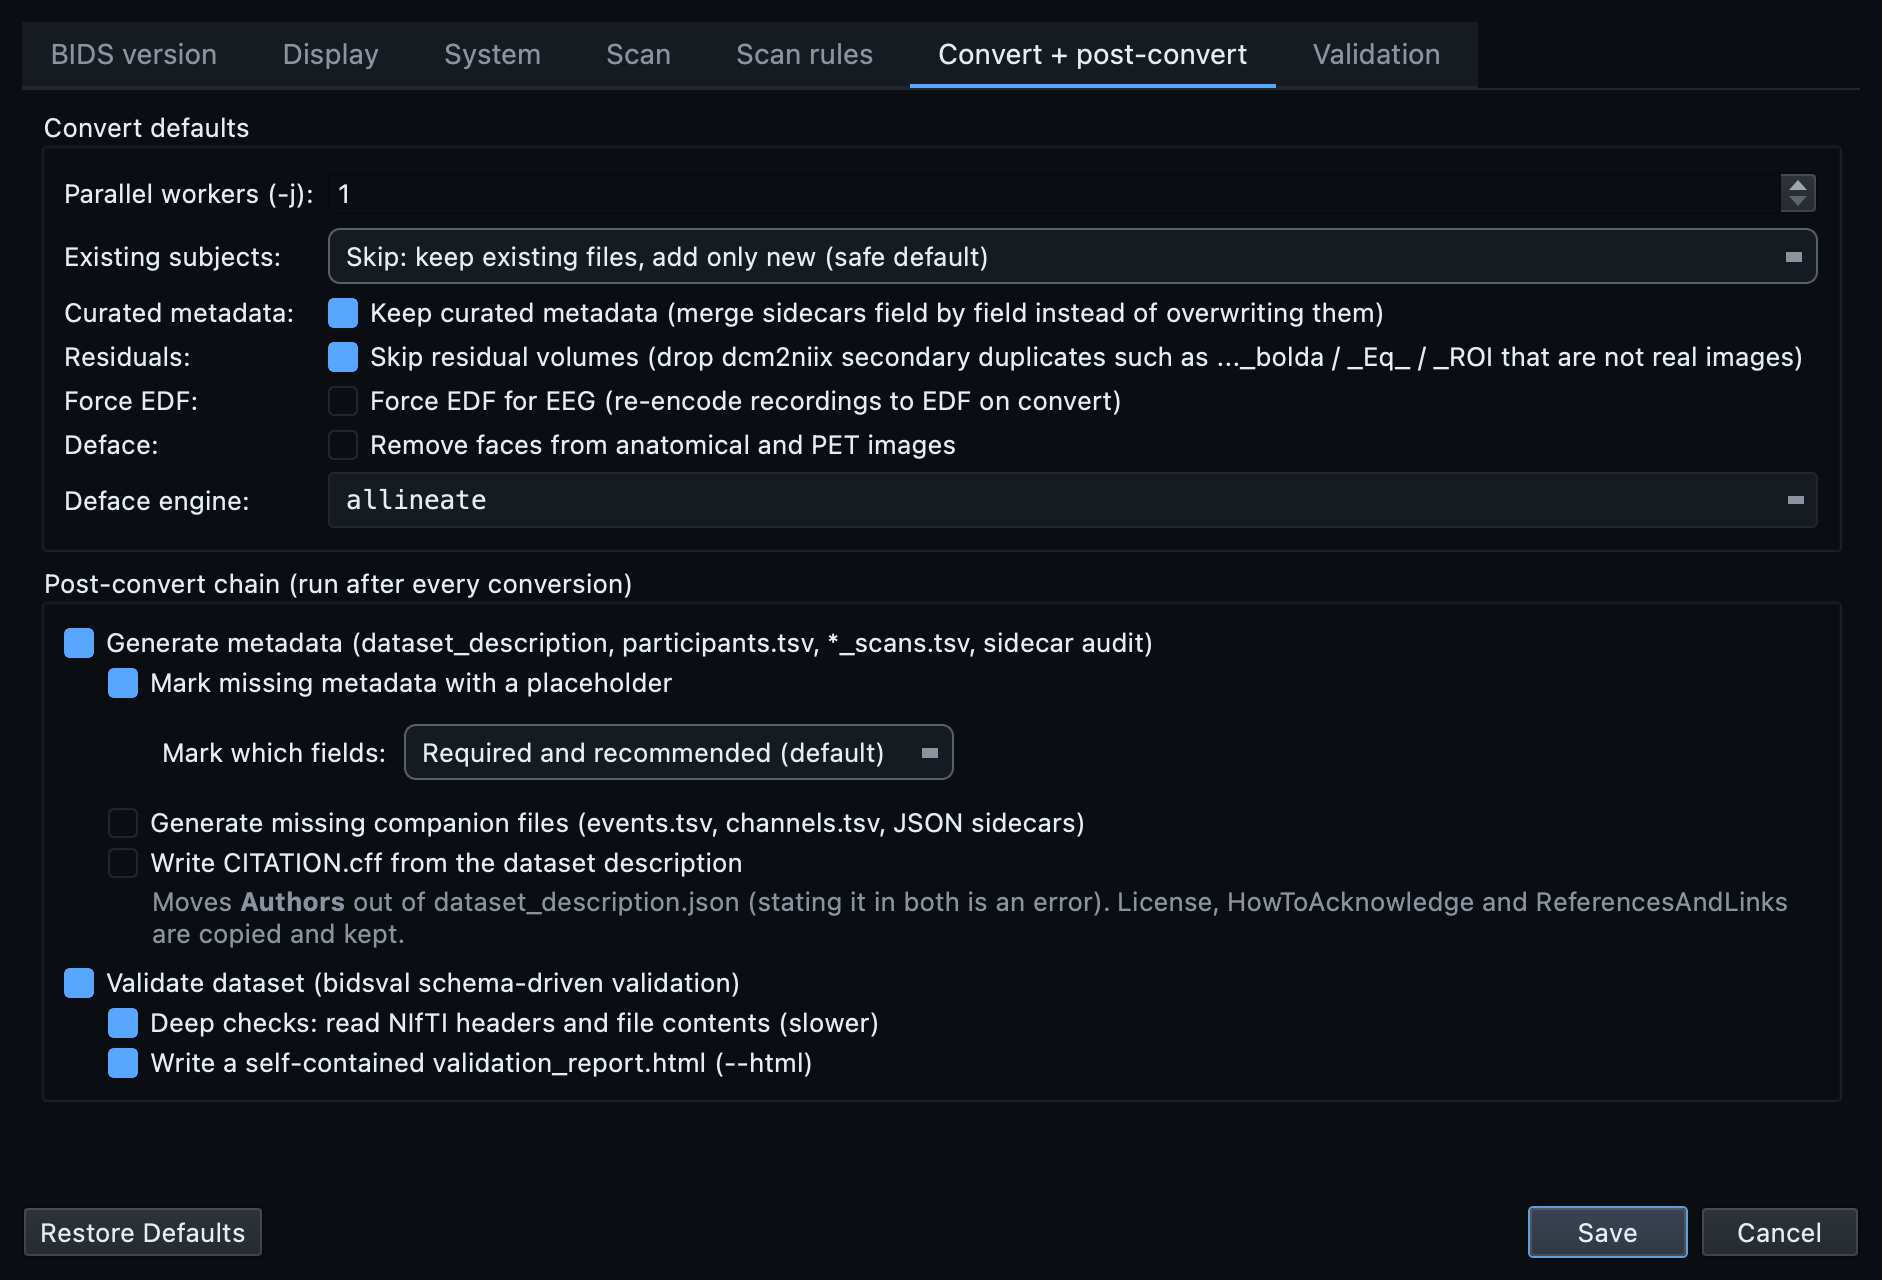
The Convert and post-convert tab of the Settings dialog, with the post-conversion chain as an indented list
Conversion does not stop at writing the files. The chain underneath it fills the metadata, validates the result and writes a report, and it is all on by default, so pressing Run once gives you a converted and checked dataset. Every step can be switched off, and the rest of this dialog is covered in Settings below.

5. Inspect the converted data

Open the result in the Editor and look at volumes, time series, and MEG / EEG recordings, all rendered in-app.

NIfTI viewer

A Multi-Planar view (sagittal, coronal and axial) sharing one crosshair, plus a single-pane 2-D view. Click and drag to move the crosshair and scrub through slices.

3-D volume rendering

The 3D tab renders the volume on the graphics card: rotate it, zoom, and cut through it with an oblique clipping plane whose cut face shows the slice underneath. There are materials and lighting presets, an orientation cube, and a switch between radiological and neurological convention that applies to the 2-D views as well. On a machine without suitable graphics support the tab is absent and the rest of the viewer works as usual.

4-D time series

For BOLD and other 4-D volumes, a graph of the signal at the crosshair voxel across all volumes, alongside the slices, for a quick sanity check of the time course.

MEG / EEG signal viewer

A metadata card first, then load the signal into an interactive viewer: pick channels, scroll and zoom, apply high-pass / low-pass / notch filters, resample, open an in-app PSD, and overlay BIDS-native events. No external tools needed.

6. Edit and validate

Fix sidecars and tables in place, then audit the dataset against the BIDS schema and jump straight to any issue.

Edit JSON sidecars

Clicking a .json sidecar opens a schema-aware form: fields are colour-coded by level (required / recommended / optional / deprecated), and you can add or delete fields, edit values, and revert or save. A Tree view shows the raw key / value structure when you need it.

Edit TSV tables

TSV files (participants.tsv, channels.tsv, events.tsv, *_scans.tsv) open in an editable table that loads on a background thread, so even very large or wide files appear instantly and never freeze the window.

Validate the dataset

Run validation at file, folder, or whole-dataset scope. The fast pass checks naming, entities, sidecar fields, TSV columns and associations. Deep checks additionally opens NIfTI image headers to catch truncated or corrupt files. Findings are listed by severity, and the counts on the tree update to match.

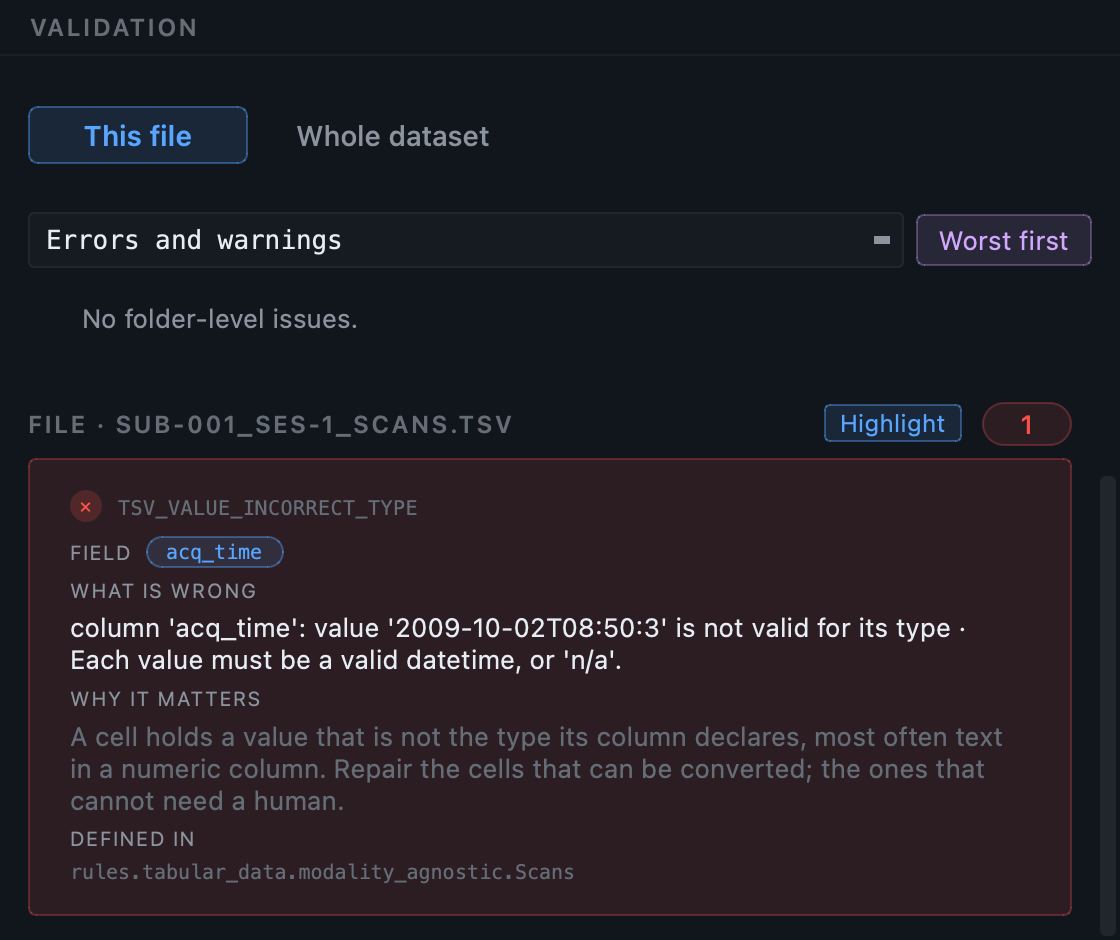
Where a finding comes from

A validation finding with the schema rule it came from printed underneath the message
Each finding carries the schema rule it came from, printed beneath the message. A rule path such as rules.tabular_data.modality_agnostic.Scans points at the part of the standard the requirement is drawn from, so it can be checked rather than taken on trust. The same provenance appears in the HTML report.

Jump to issues from the chips

The severity chips in the toolbar are clickable: open the warnings (or errors) list, then click an entry to jump straight to the offending file in the viewer, fix it, and re-validate.

Reading the tree at a glance

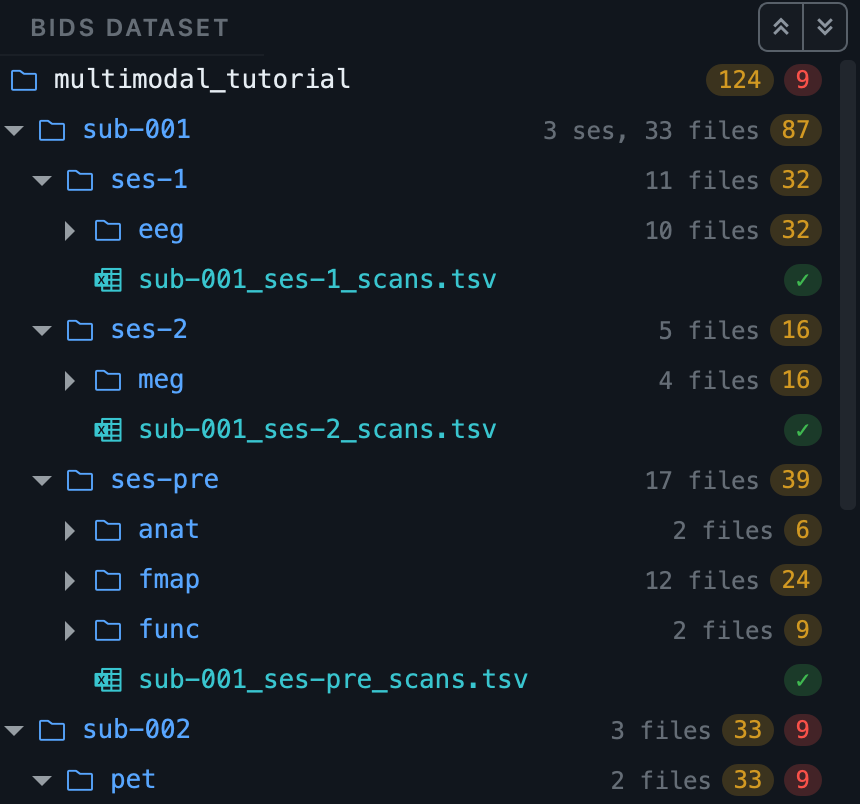
The BIDS tree with a count of errors and warnings on every row
Every row carries how many findings are inside it: warnings in amber, errors in red, and a green tick where a file was checked and is clean. Folders add up what they contain rather than showing the worst of it, and say what they hold (3 ses, 33 files), so a subject can be read without expanding it. The number is the useful part. A mark that only says "something is wrong in here" is where a search begins, whereas a subject with one missing recommended field is visibly different from one with ninety.

7. Understand a dataset before you change it

Two questions come before any edit: what is actually in here, and can I take back what I do next. Both live under Tools in the Editor toolbar.

The Dashboard
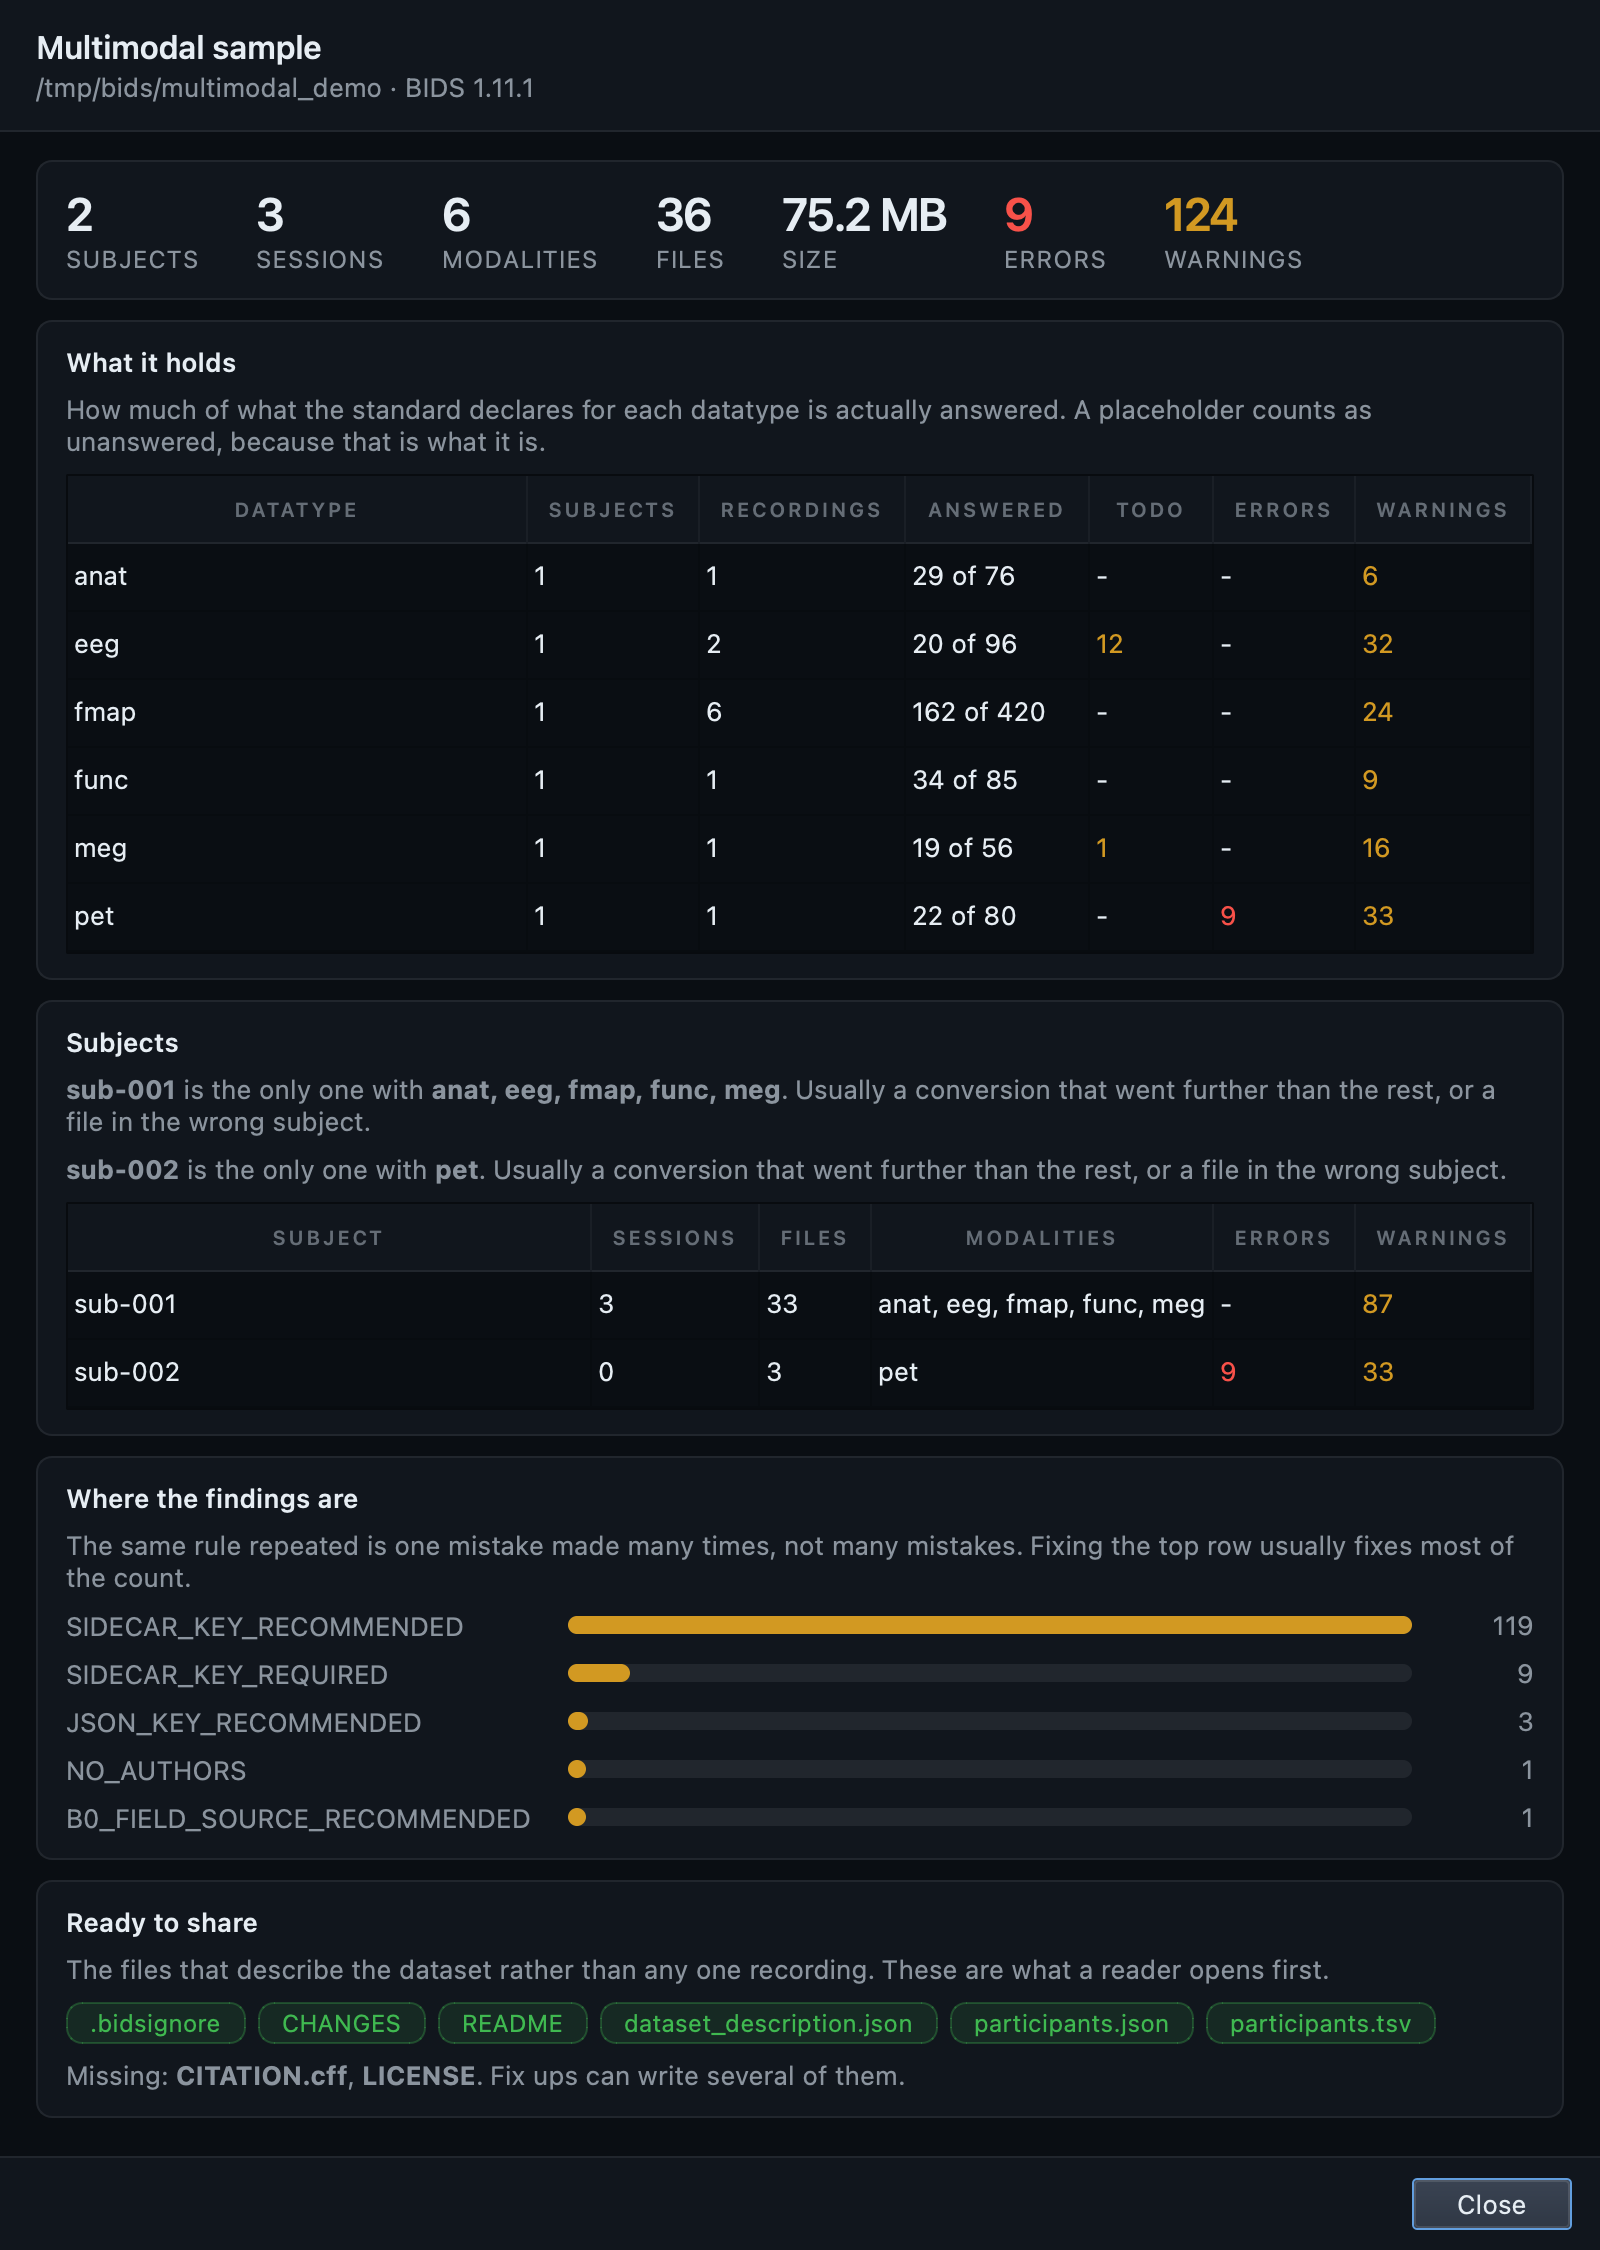
The Dashboard: what the dataset contains, counted per subject and per datatype
What this dataset contains, how evenly it is filled, and where the work is. It answers the question you have on opening a dataset somebody else made, or returning to your own after a month, which the file tree cannot answer because the answer is a shape across hundreds of files: how much of the metadata each modality has answered, which subject is the odd one out, which rule accounts for most of the findings, and whether the files a reader opens first are there at all. It reports counts, not scores. "29 of 76 declared fields are answered" can be checked against the files; a completeness percentage can only be believed.

Track changes on a dataset you did not make
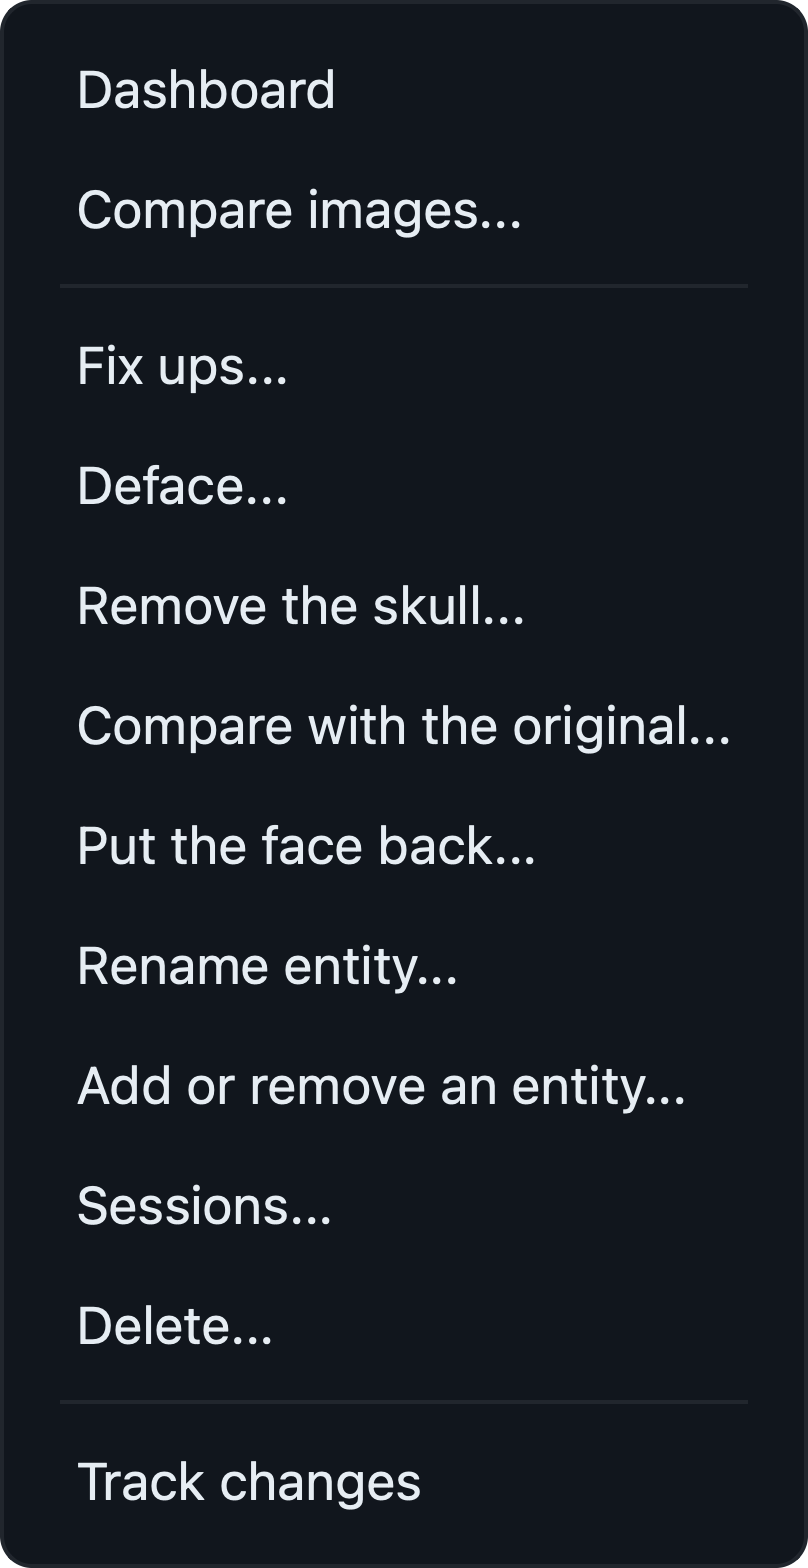
The Tools menu in the Editor, listing Dashboard, Fix ups, the restructuring actions and Track changes
Everything on this page lives in one menu. The last entry matters if the dataset came from somewhere else: there is no record of what it looked like before you arrived, so nothing you do can be taken back. Track changes reads every file once and writes that starting point into a .bidsmgr folder. Nothing else in the dataset is touched, and every BIDS tool ignores dot-folders, so validation is unaffected. The entry disappears once a dataset is tracked.

8. Fix many files at once

A problem is rarely in one file. Fixing it once and being asked which of the other eleven should get the same answer is the difference between a tool and a text editor.

Fix in all files
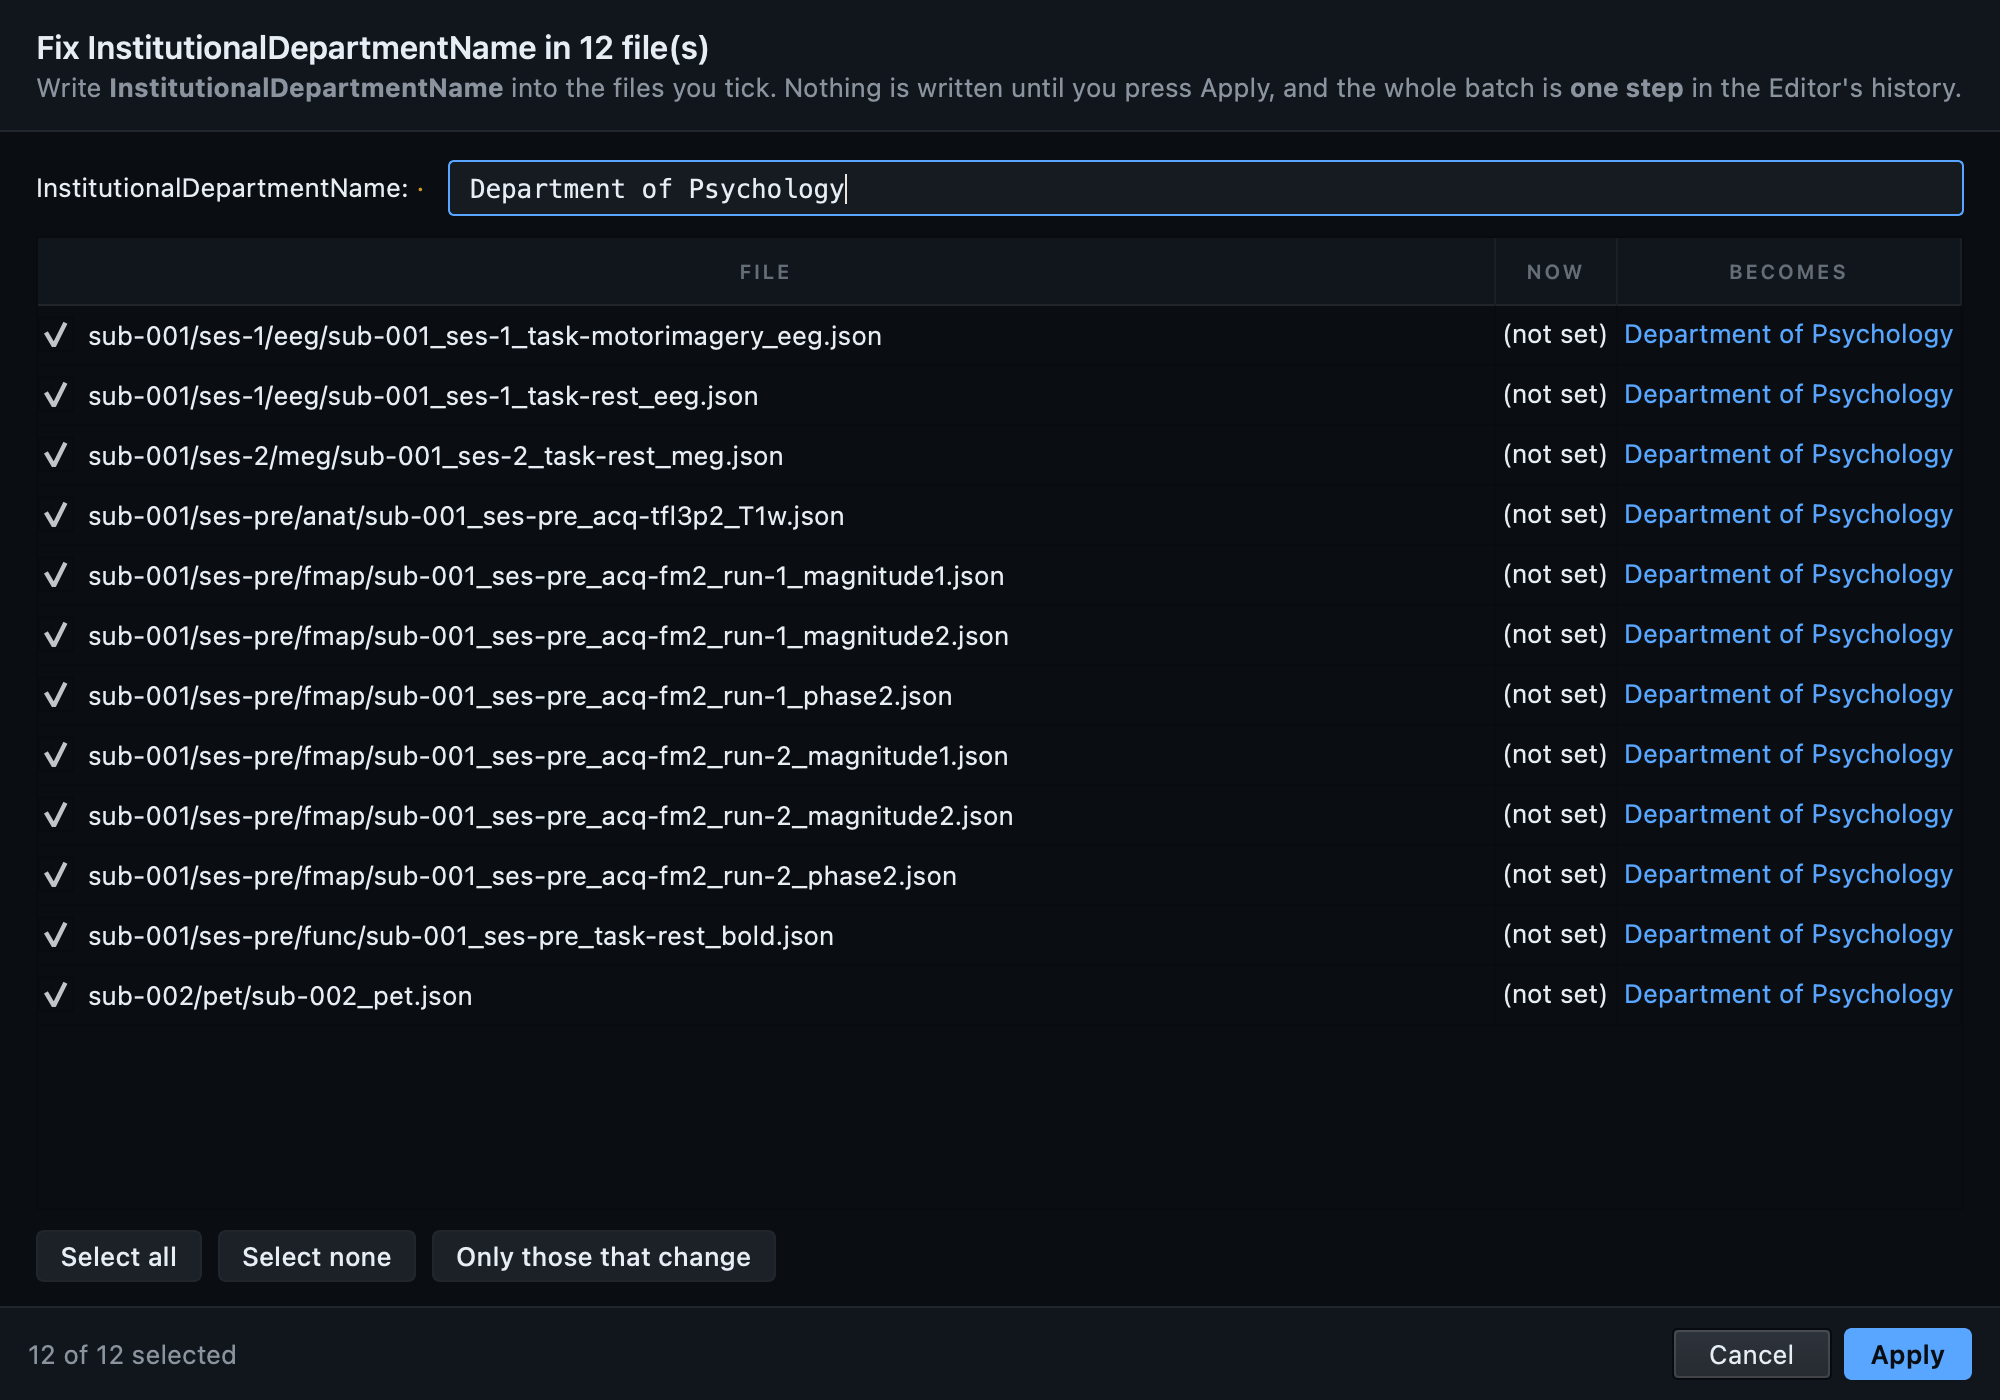
One finding and the twelve files it fired on, each showing its current value and what it would become
Findings in the validation pane are grouped by what is wrong rather than by file, and a group that names a field carries a Fix in all files button. A count on its own would not be enough to act on: "12 files" says how many, not which, and not what each one says now. So every candidate is listed with its current value and what it would become, ticked only where the value would actually change, and nothing is written until you press Apply. The whole batch is a single step in the Editor's history, so one Undo takes all twelve back.

Fix ups

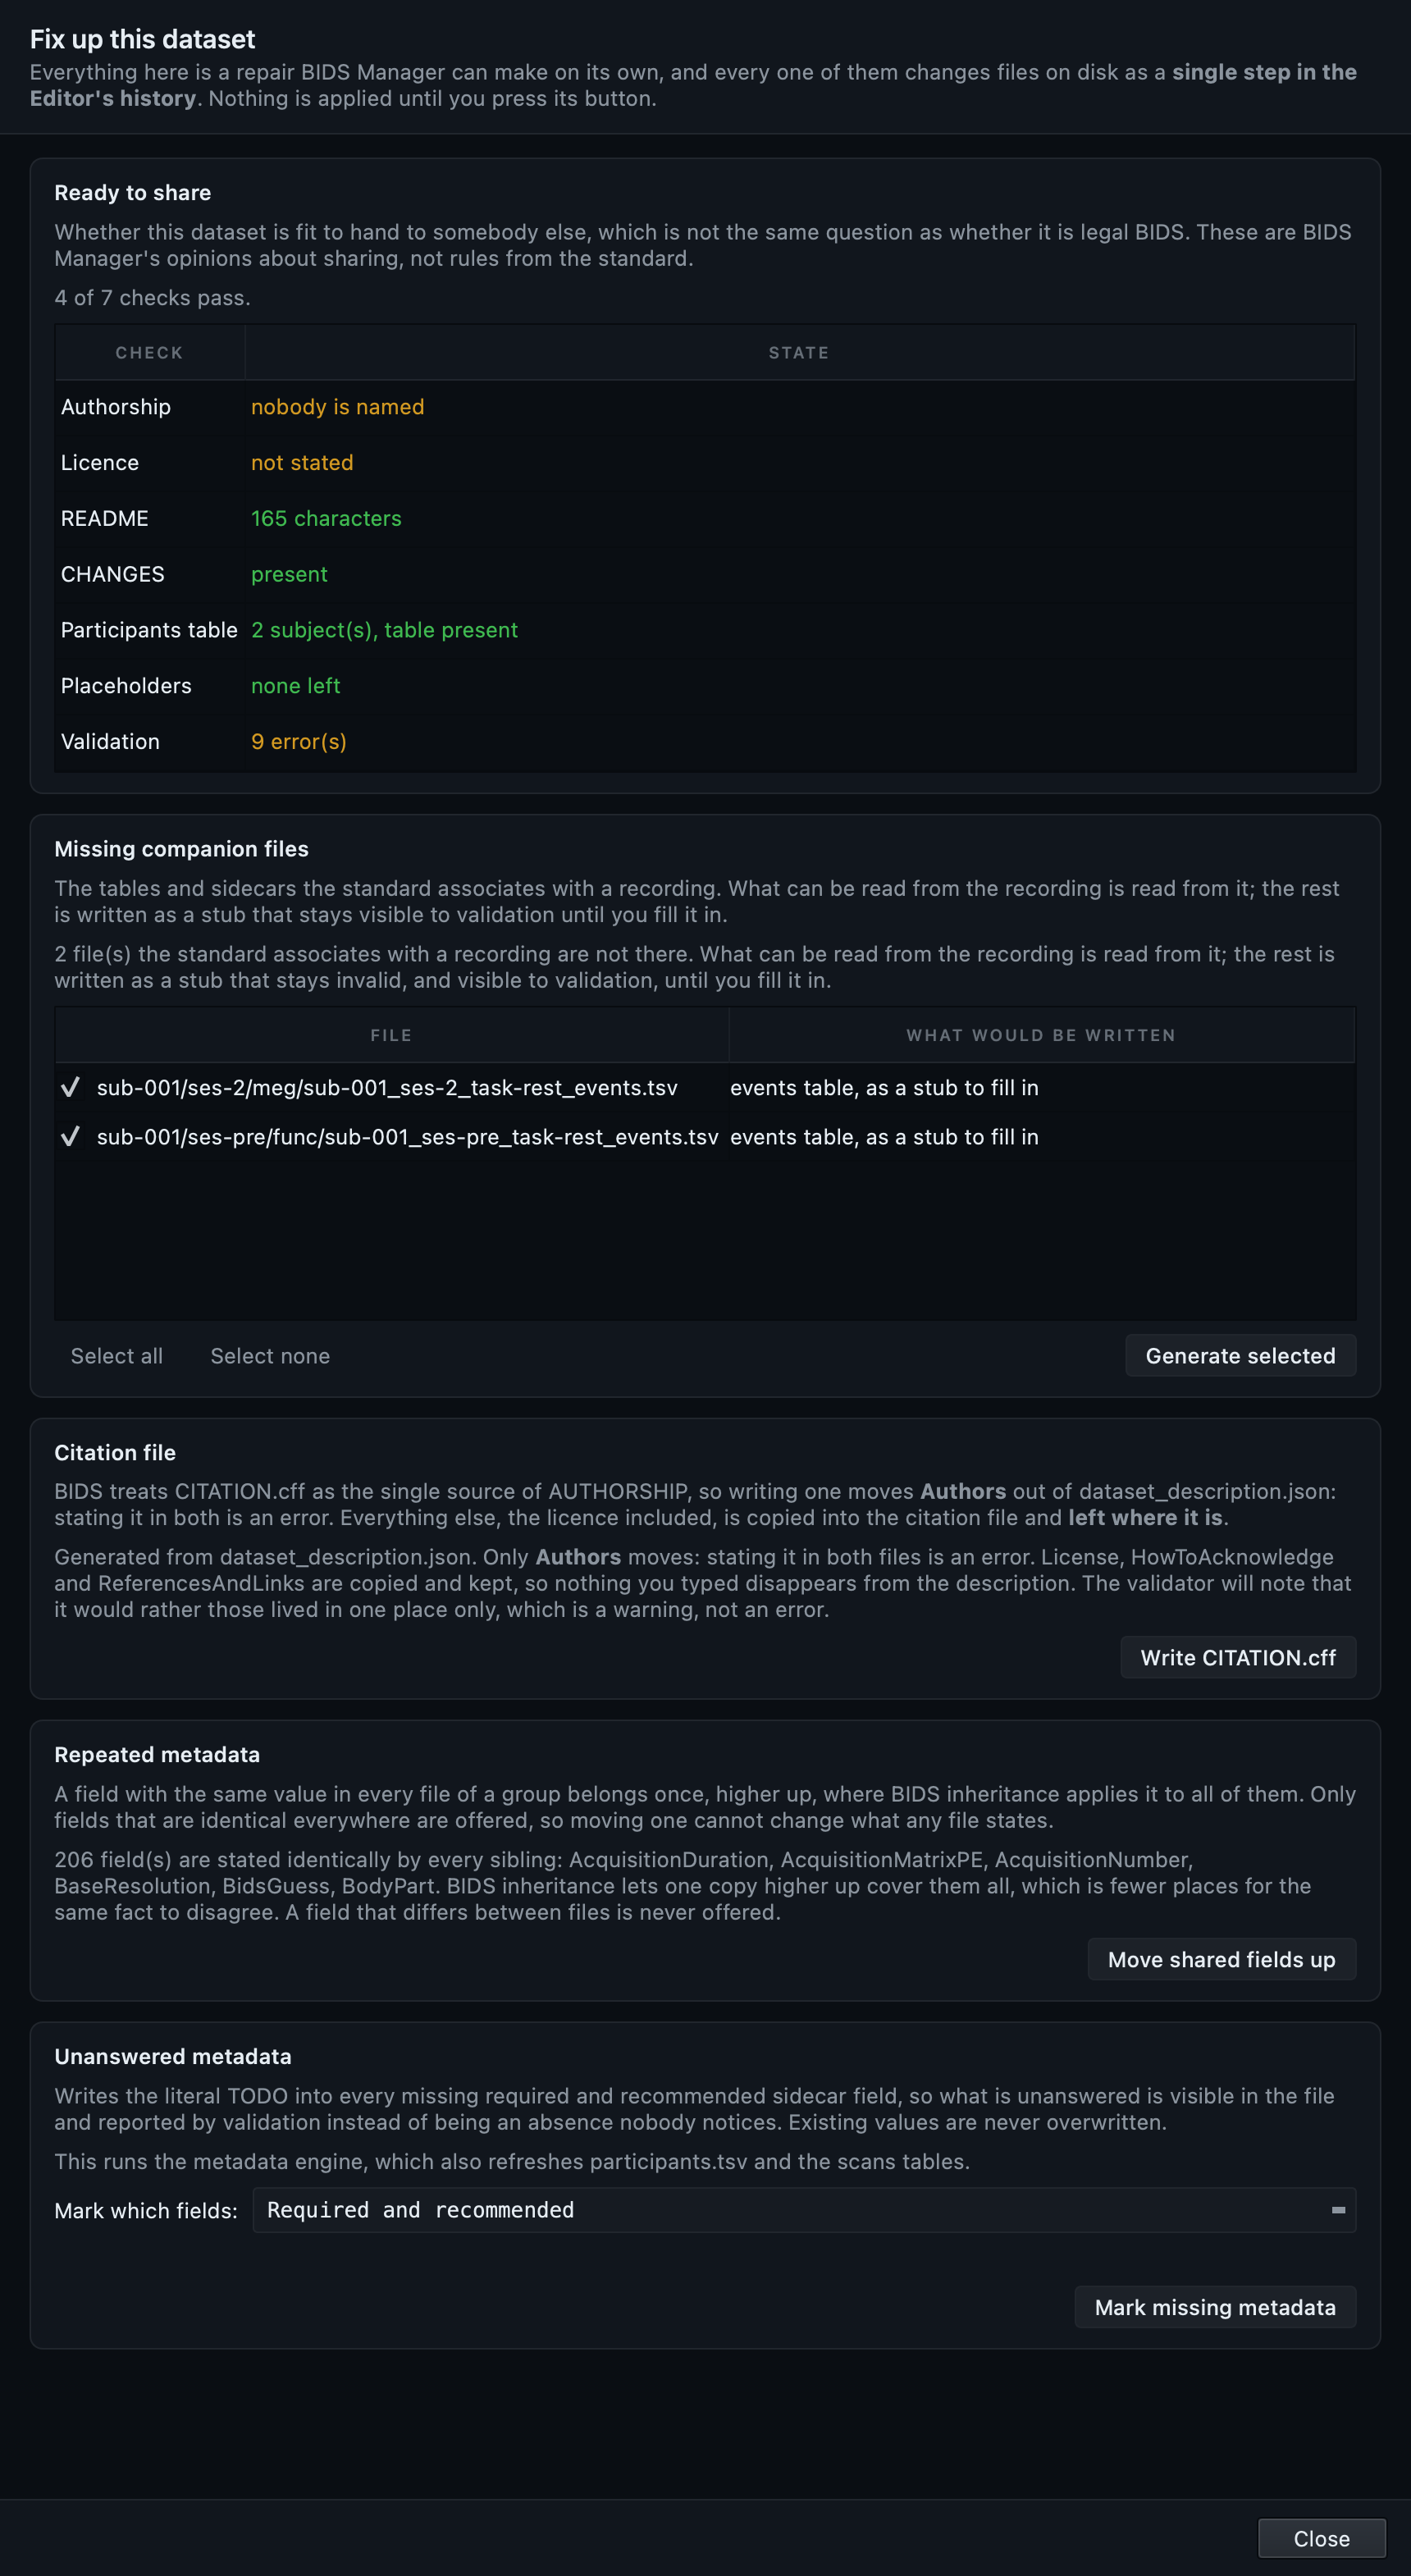
The Fix ups dialog: readiness checks, missing companion files, a citation file, repeated metadata and unanswered metadata
Five repairs that apply to the dataset as a whole. At the top, whether it is fit to hand to somebody else, which is not the same question as whether it is legal BIDS: is anybody named as an author, is a licence stated, is there a README worth reading. Then the tables and sidecars the standard associates with a recording but that are not there, each listed with what would be written into it. Then a CITATION.cff generated from the dataset description. Then repeated metadata: a field every file in a group states identically belongs once, higher up, where BIDS inheritance applies it to all of them, and only fields that are identical everywhere are offered, so moving one cannot change what any file says. Last, unanswered metadata, which writes the literal TODO into missing fields so an absence is visible in the file and reported by validation rather than going unnoticed. Nothing is applied until you press its own button, and each one is a single undoable step.

9. Change the shape of a dataset

Sooner or later a converted dataset is the wrong shape. A task label is wrong on forty files, two scanning visits were never recorded as sessions, a pilot run should not have been converted at all.

Moving the files is the easy half. What actually breaks a dataset is everything left pointing at what moved: the *_scans.tsv row naming a path that is gone, the IntendedFor entry pointing at a renamed image, the participants.tsv row for a subject that no longer exists. A validator does not report any of those as a broken link, so a dataset can be quietly wrong for years. Each of the actions below repairs all of it, and each is one undoable step.

Add or remove an entity
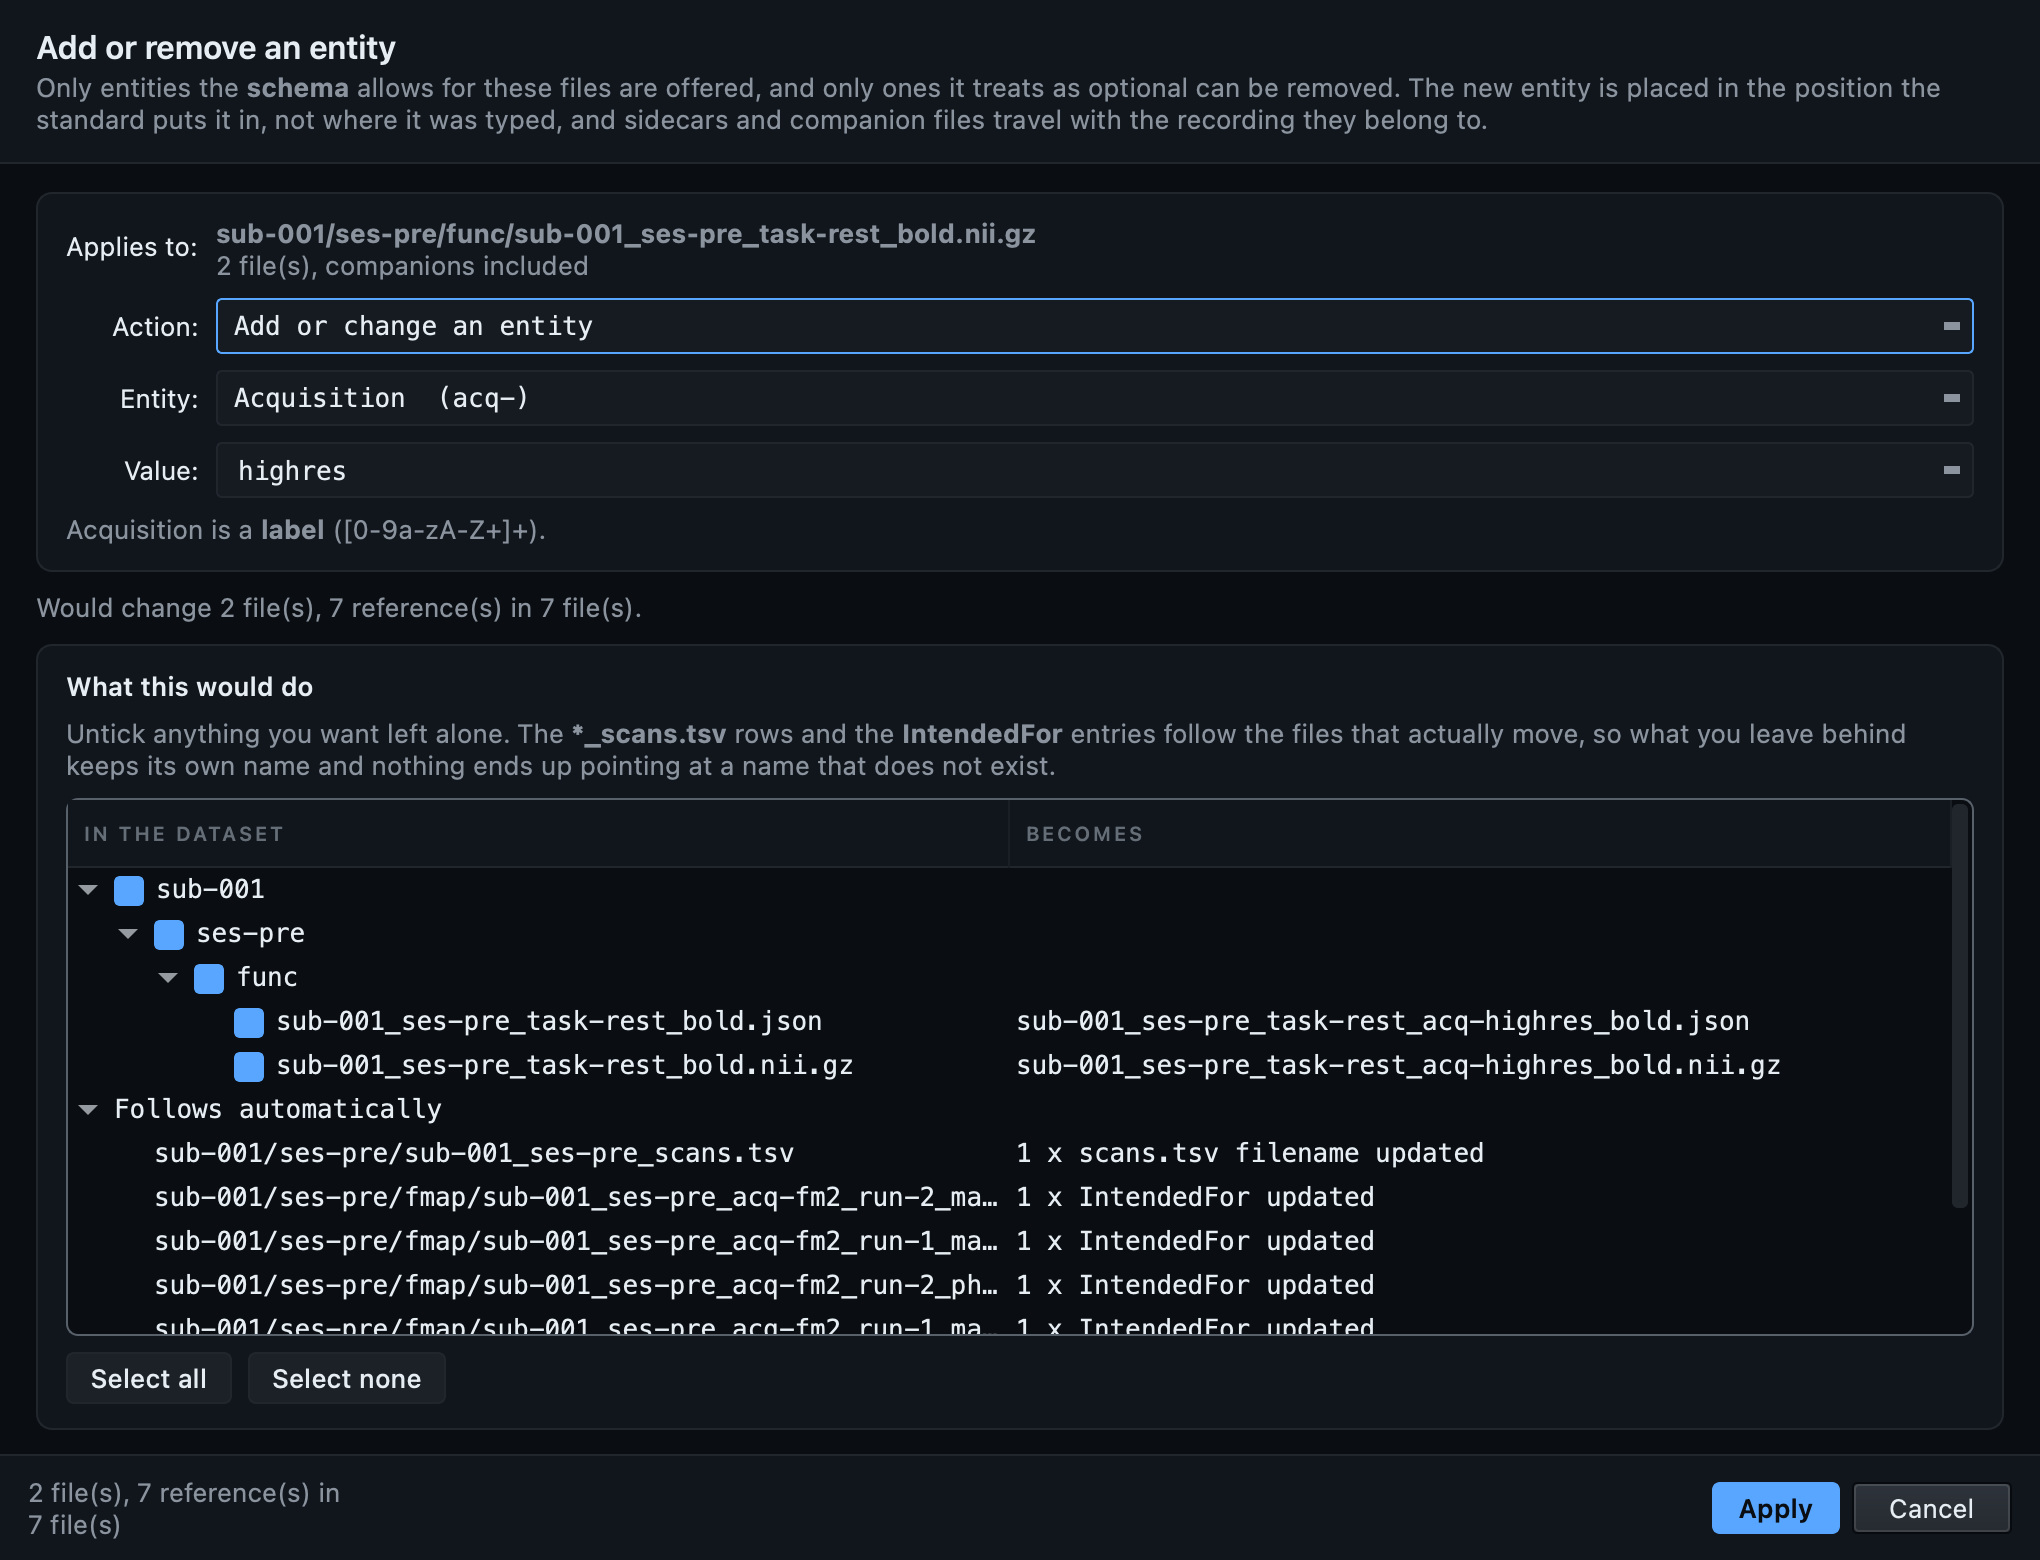
Adding an acquisition label to a functional run, with the plan already previewed
The key-value pairs in a BIDS filename are called entities, and this adds one a file is permitted to have, or removes an optional one it already has. The list of entities on offer is short on purpose: it holds only what the standard allows for this kind of file, so there is no echo on an EEG recording, and a required entity cannot be taken away. The new pair is placed in the order the standard defines rather than where you typed it. Sidecars, event tables and channel tables travel with their recording.

Create or dissolve a session
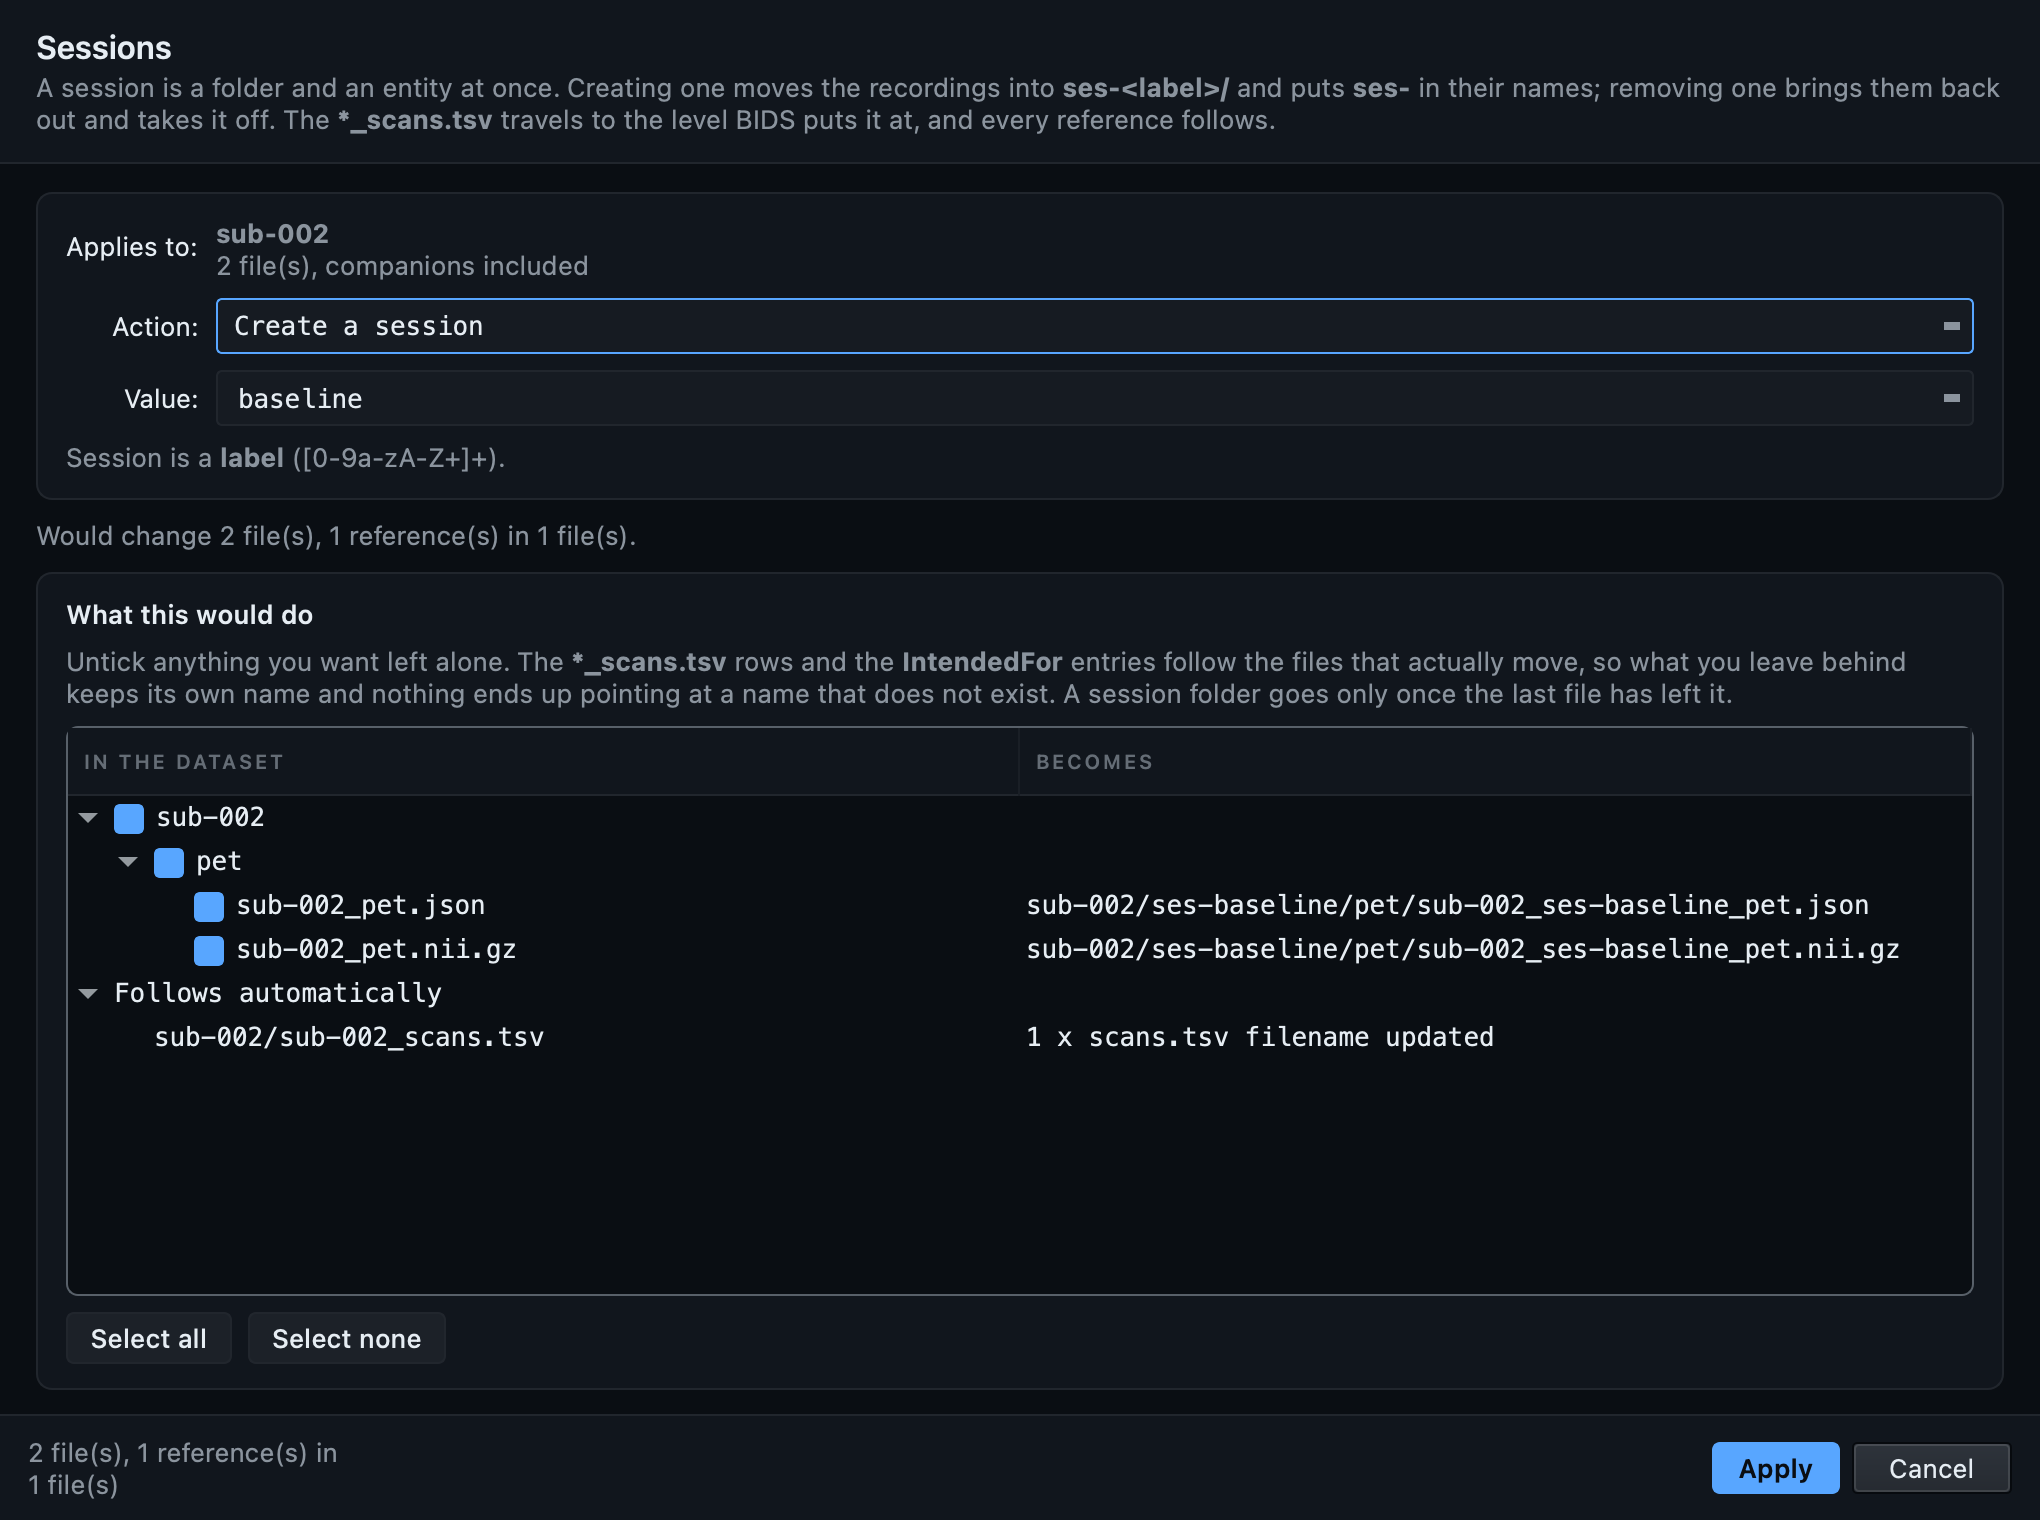
Creating a session, with the preview showing the whole destination path for each file
A session is an ordinary entity that happens to name a folder, so creating one is the same operation as adding any other label, and the folder follows from the standard rather than from anything you have to type. The preview shows the whole destination path, because these files change folder and not only filename, and the scans table moves to the level BIDS defines for a dataset that has sessions. Dissolving a session is the same thing in reverse.

Delete, with the references repaired

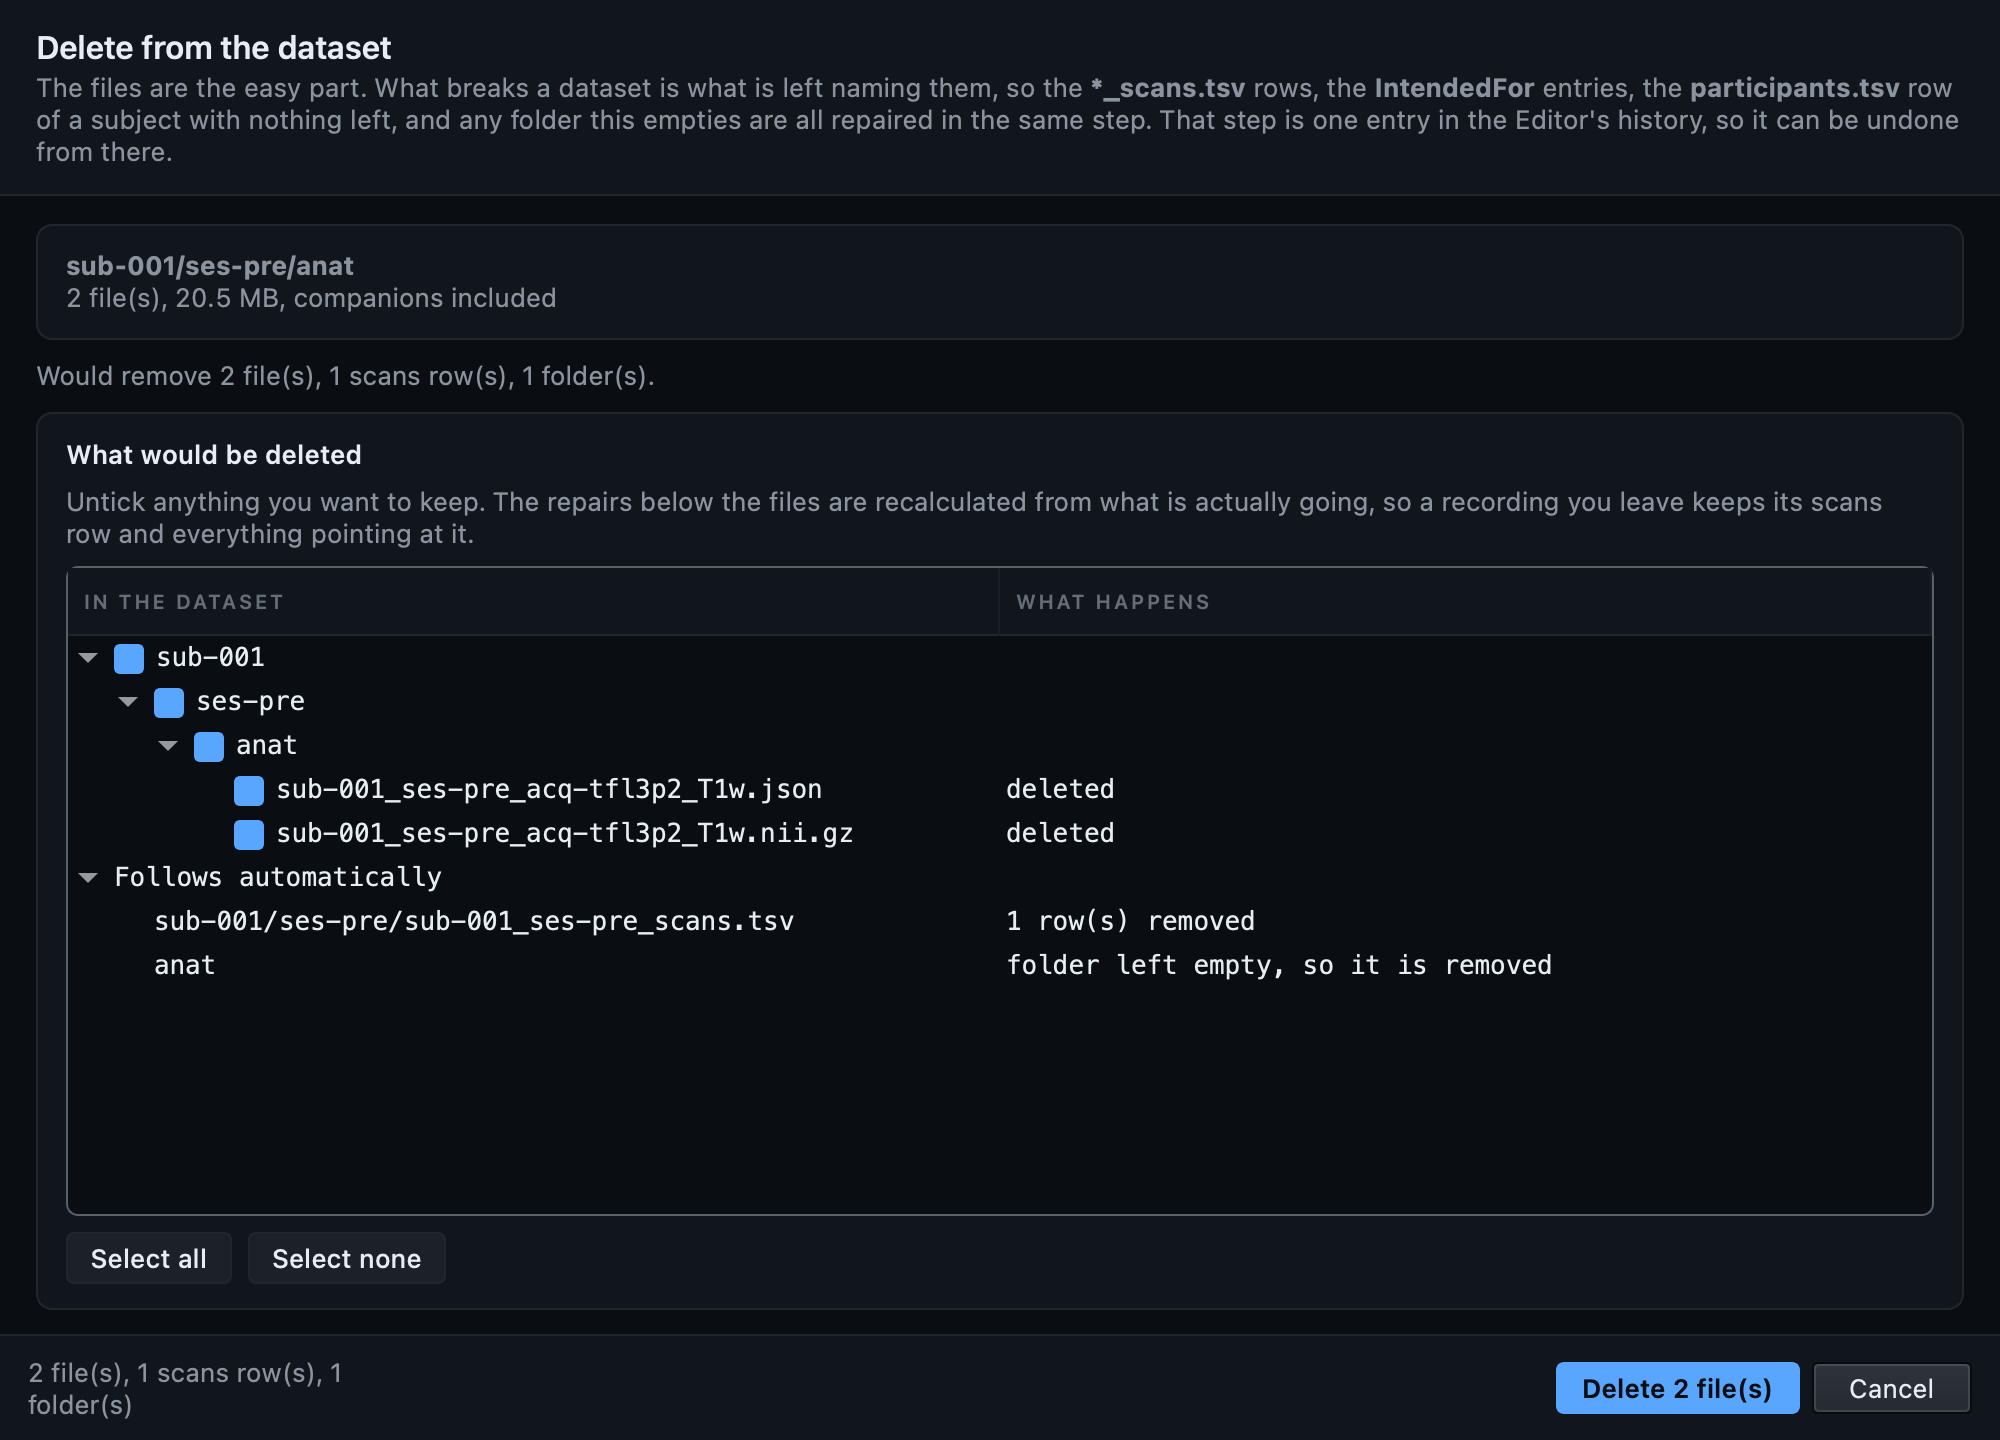
Deleting an anatomy folder, with the repairs that follow listed underneath
Remove a recording, a datatype, a session or a whole subject. Follows automatically is the part worth reading: the scans rows that named those files, the IntendedFor entries pointing at them, the participants row of a subject with nothing left, and the folders the deletion empties. A scans table is removed only when nothing it describes survives; otherwise it is edited instead. The dataset root, dataset_description.json and the change history itself are refused.

Choose file by file, and see what follows
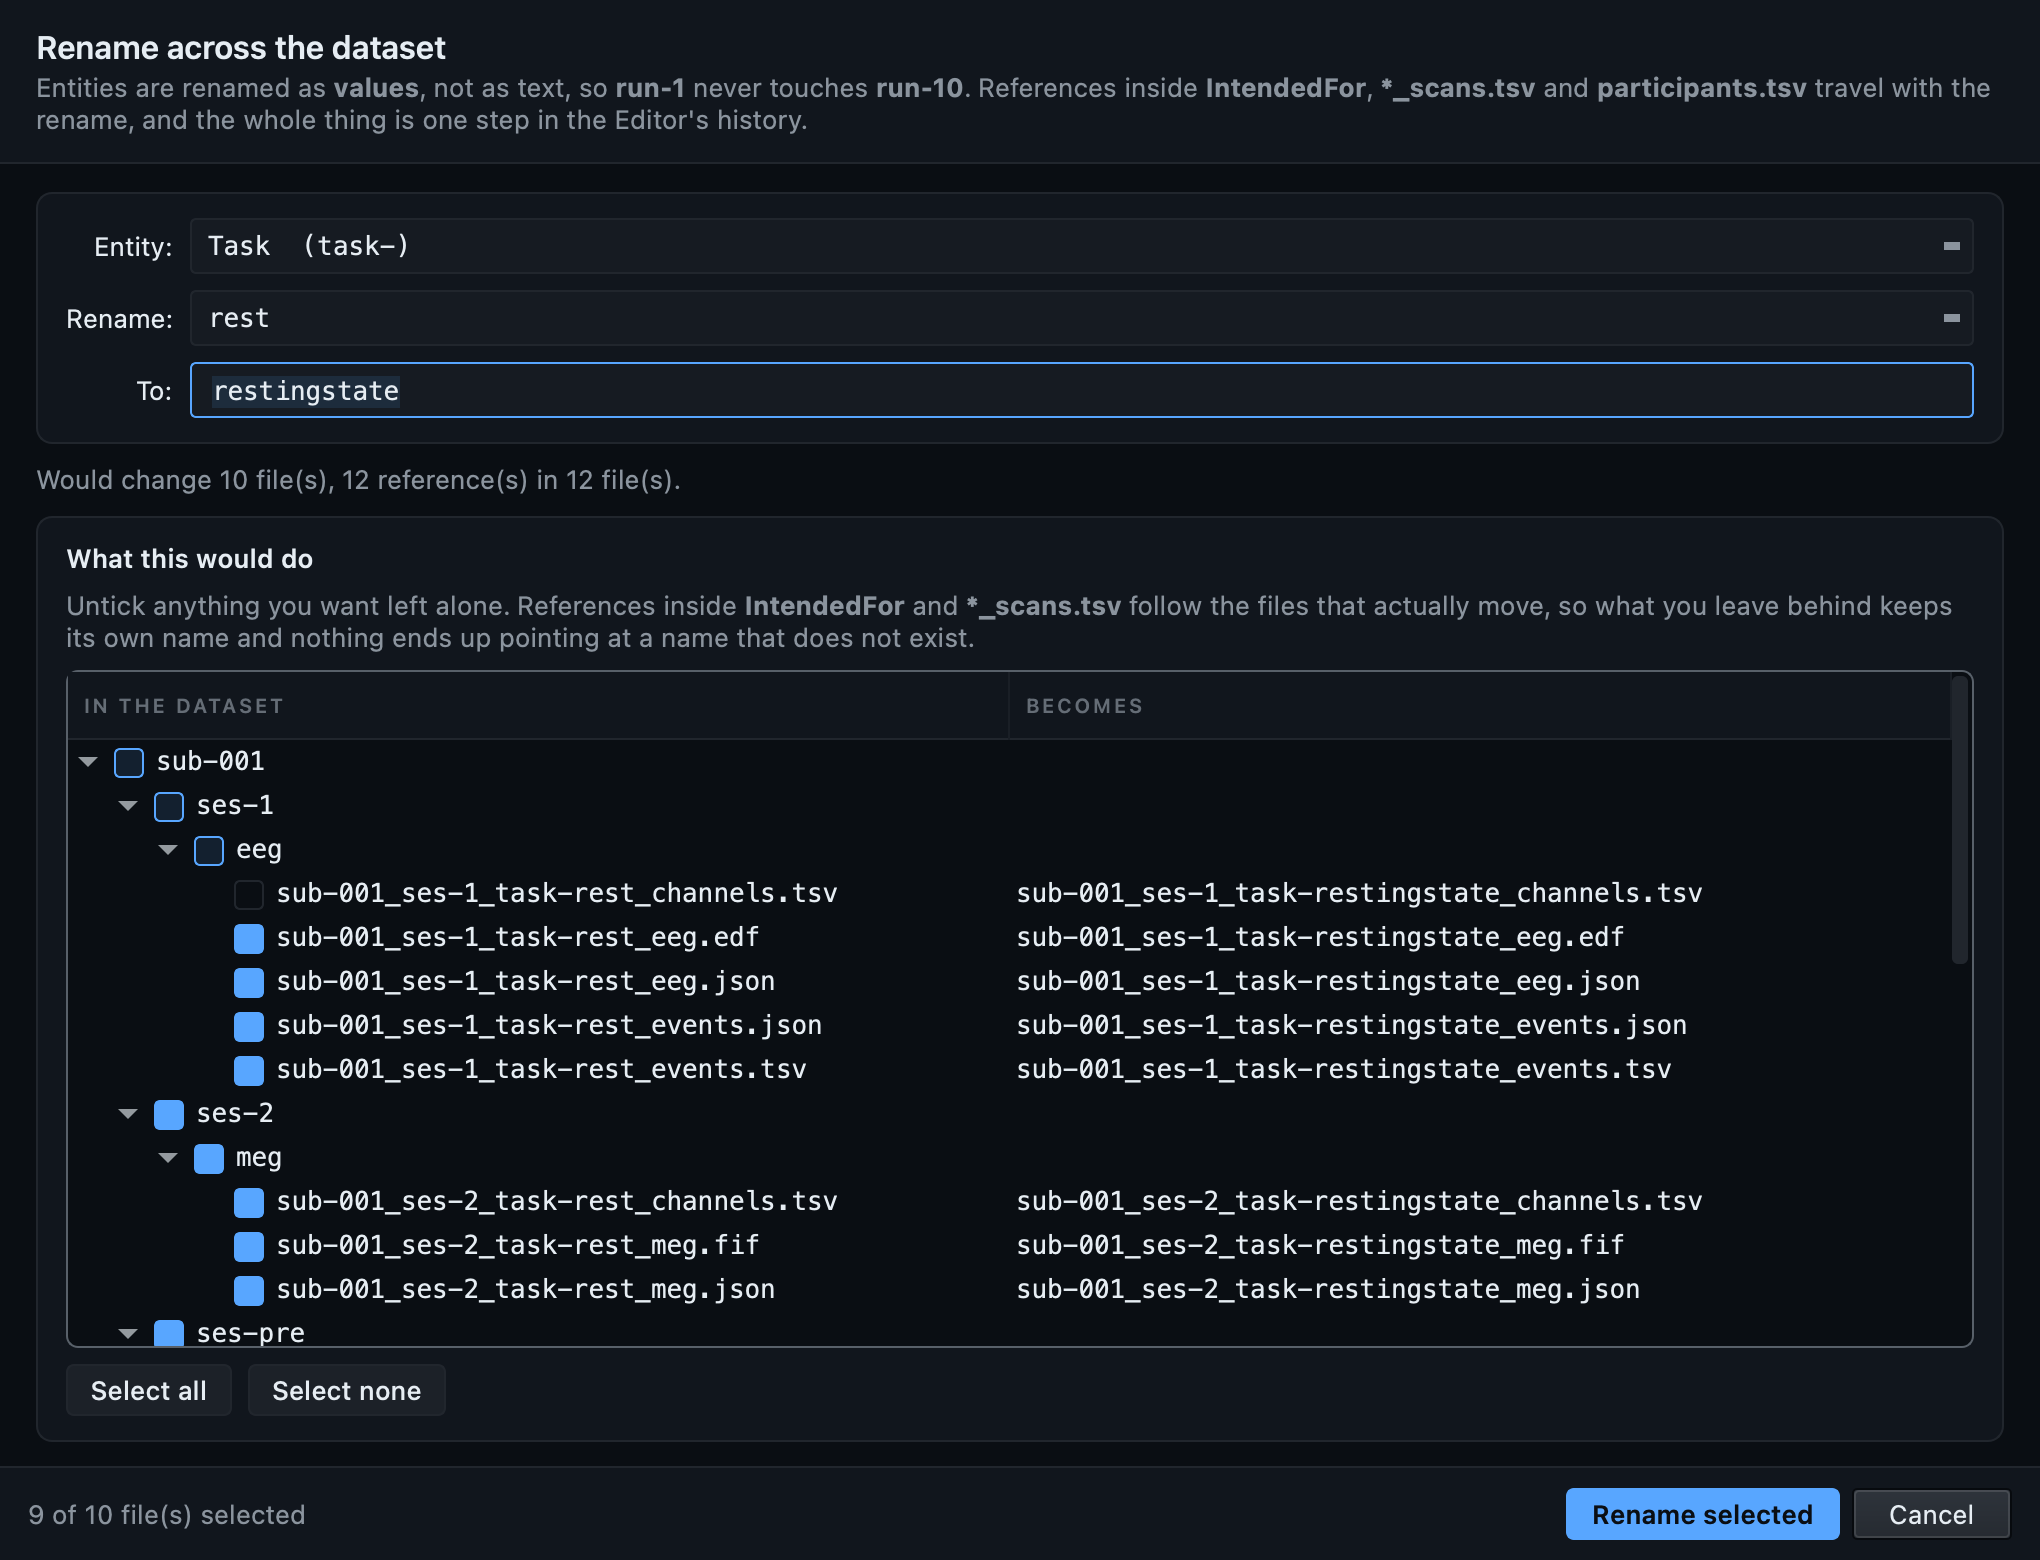
The preview tree nested by subject, session and datatype, with one file unticked and its folders shown part-selected
All three of those, and Rename entity alongside them, preview into this same tree, nested the way the dataset is actually shaped: subject, then session, then datatype, then file. The one pictured is a rename of a task label. Every file has its own tick box, and the folders above a part-ticked one show that they are part ticked, so acting on some of a selection is a legitimate answer. Here one channels table is left out, the counter reads nine of ten, and the references are recalculated for the nine that are actually going. The repairs that follow are listed underneath and cannot be unticked, because switching one off would reintroduce exactly the damage the action exists to prevent.

10. Remove the face before you share

A head scan contains a face, and a face can be rendered from one, so a dataset shared with its faces intact is a dataset shared with its participants identifiable. This can happen during the conversion itself, where the identifiable image never enters the dataset at all, or afterwards from Tools or the tree's right-click.

Every defacing tool tells you to inspect the result and then leaves you to find your own viewer, so the check is built in: the before and the after, side by side, driven as one. The engines are niimath and the brainchop brain-extraction network, both installed with BIDS Manager. The full walkthrough is in the defacing tutorial.

Choose what goes, and see what cannot
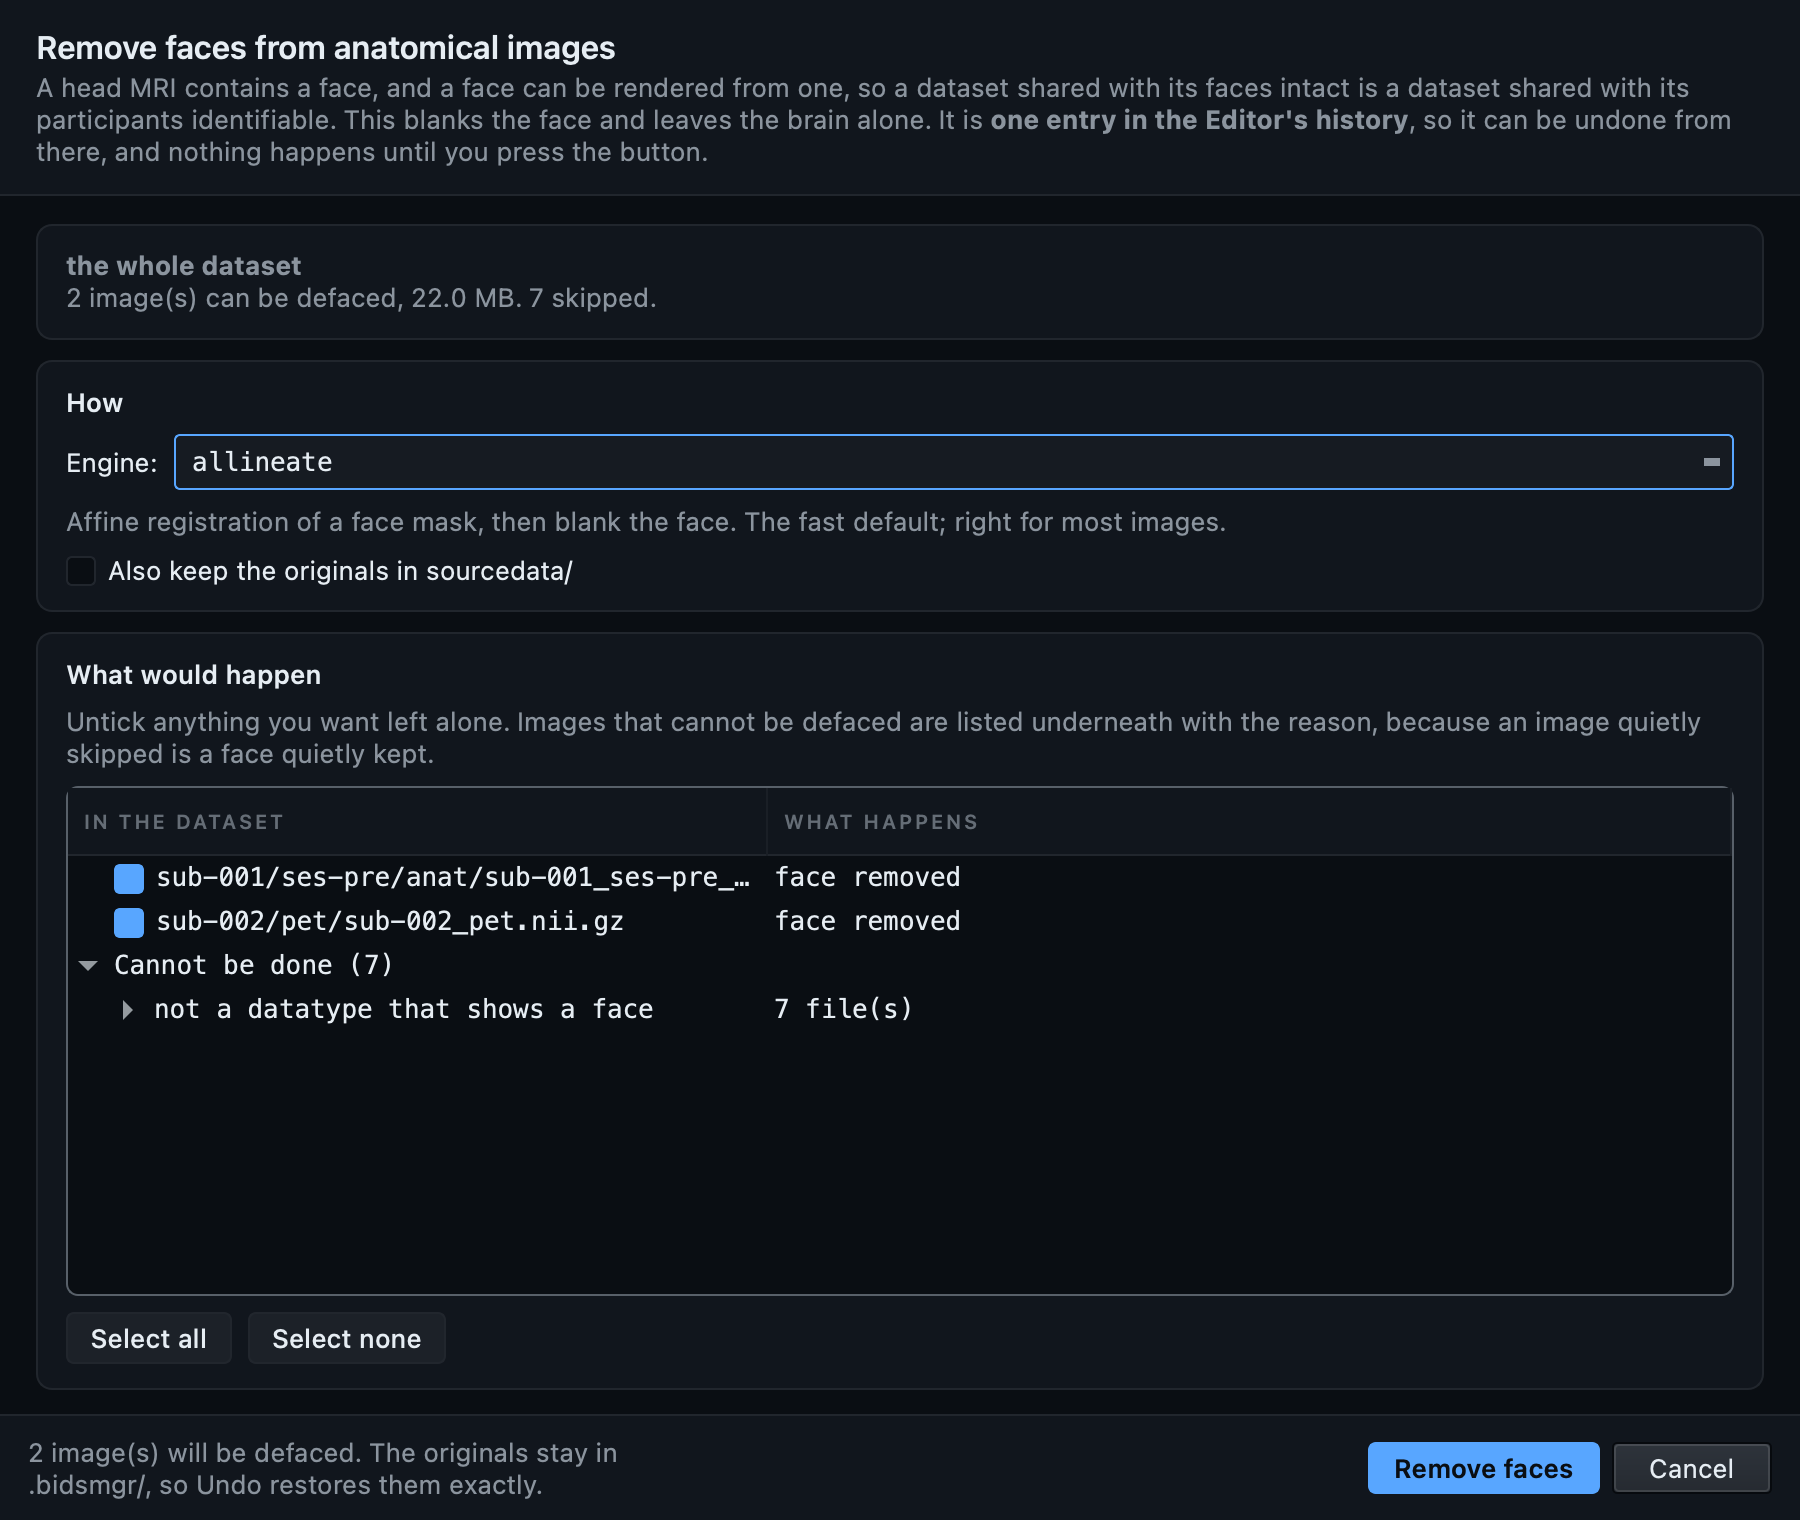
The defacing dialog with its engine dropdown, the ticked list of images and the grouped list of images that cannot be defaced
The list is ticked, so unticking is how you leave something alone. Underneath it are the images that cannot be defaced, grouped by the reason, because an image quietly skipped is a face quietly kept. The whole run is one entry in the Editor's history.

Confirm the right thing was removed

Defacing fails in two opposite directions: too little removed and the participant is still identifiable, too much and the front of the brain has gone with the face, which passes every validator. Both are obvious here and neither is obvious in a file listing.

11. Settings

Sensible defaults out of the box, so you can convert a dataset without opening this at all. The gear in the header opens seven tabs; everything in them is remembered between sessions, and Restore defaults puts any of it back.

BIDS version
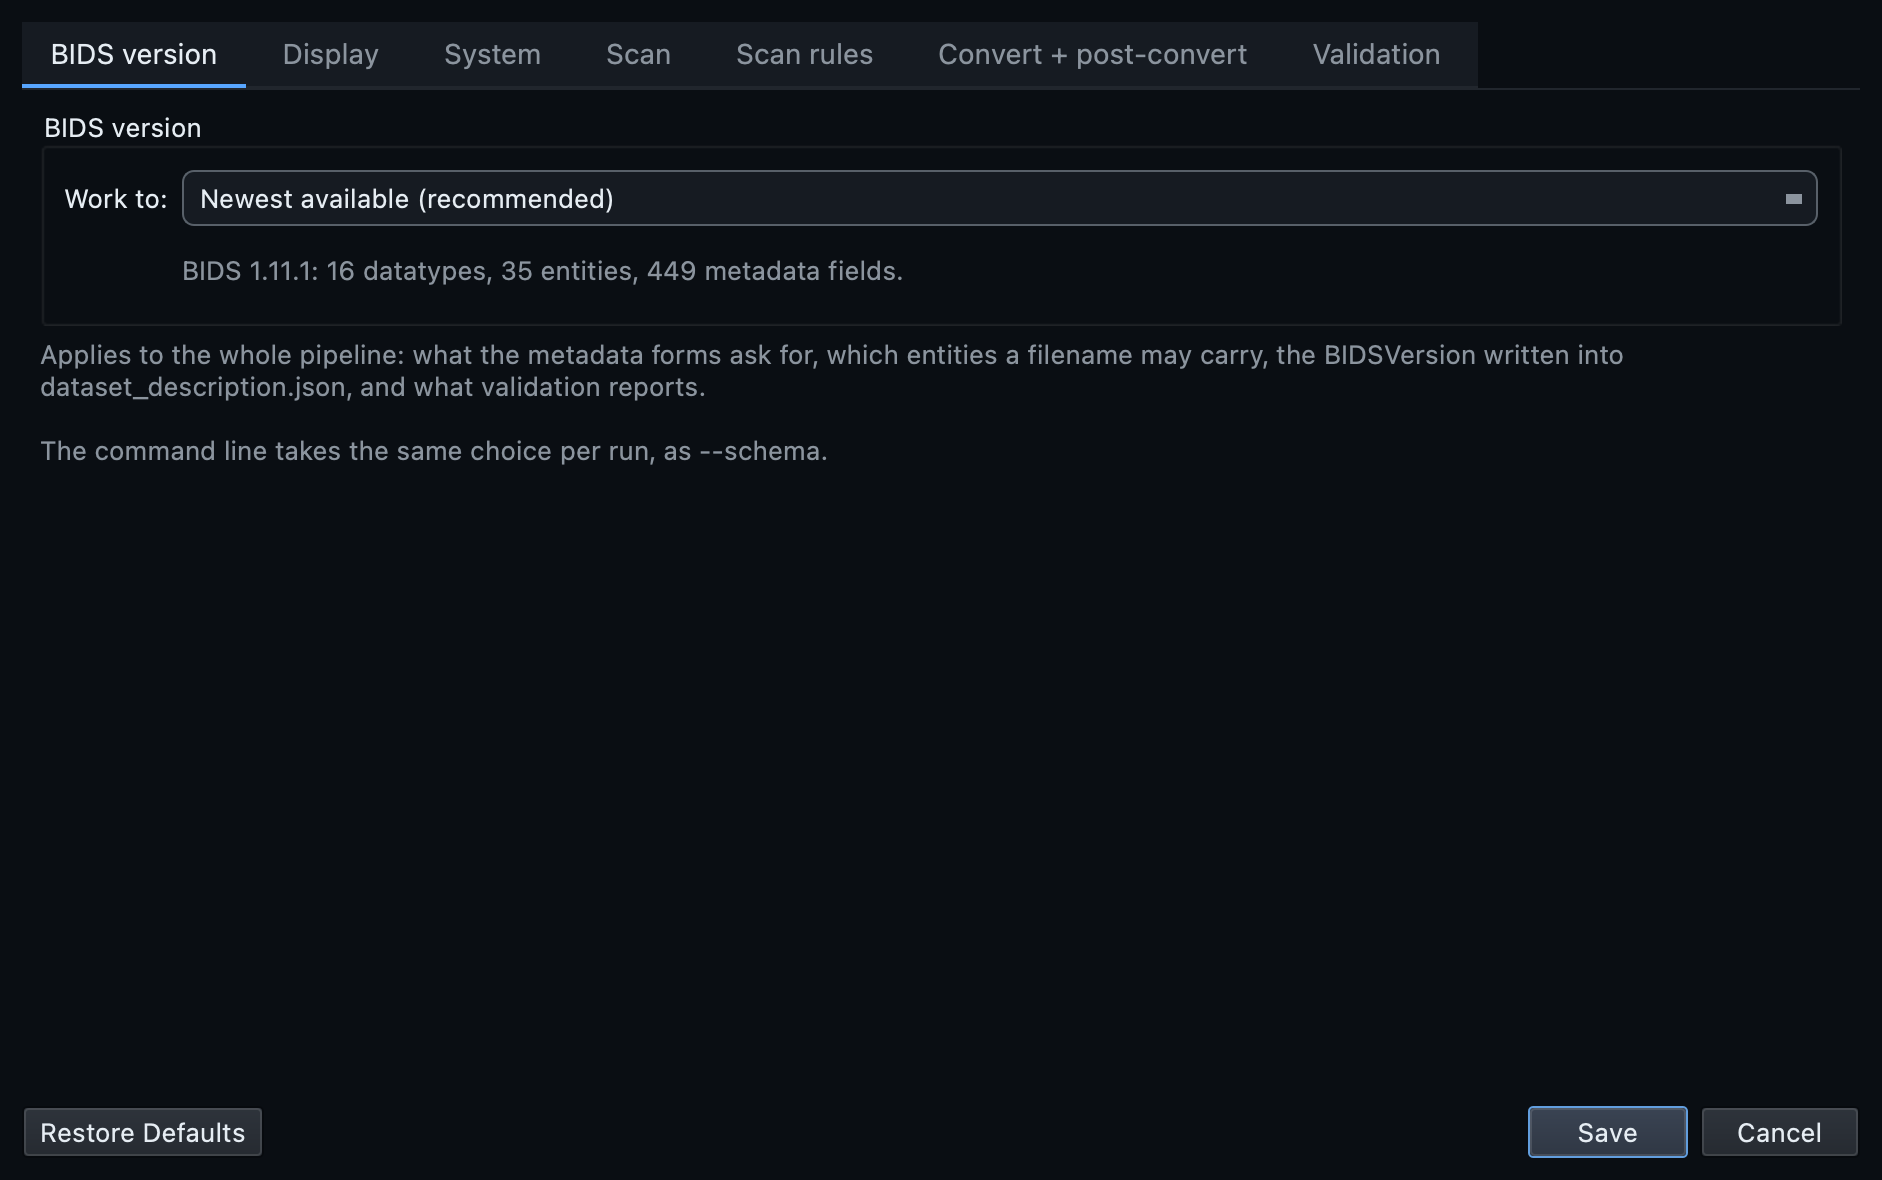
The BIDS version tab of the Settings dialog
The version of the standard this session works to. It is the first tab because it changes everything downstream: which fields the metadata forms ask for, which entities a filename may carry, the BIDSVersion written into dataset_description.json, and what validation judges the result by. Several versions ship with the application, so a dataset built against an older one can be worked on in its own terms. The command line takes the same choice per run as --schema.

Display
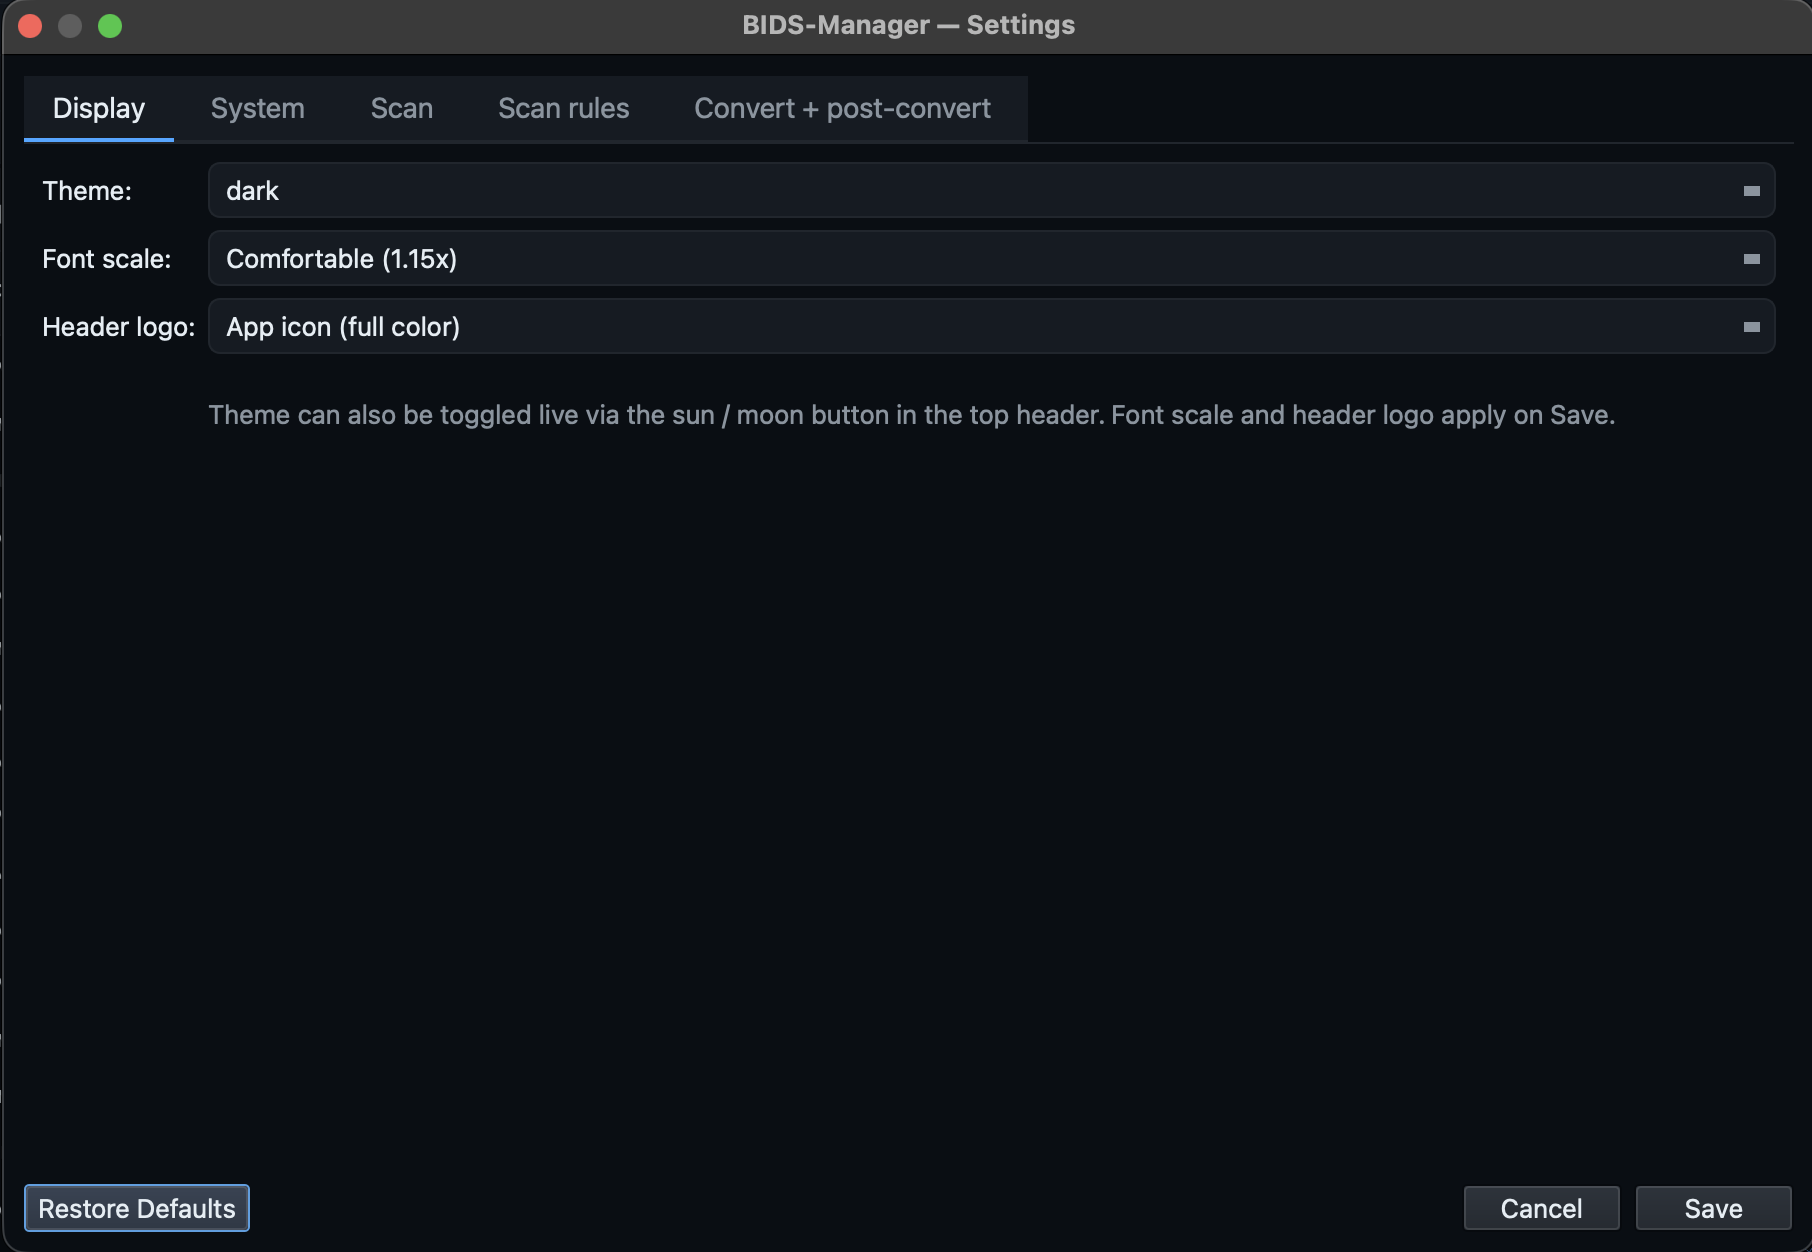
The Display tab of the Settings dialog
Theme, font scale and the header logo. The theme can also be toggled live from the header; font scale and logo apply when you save.

System

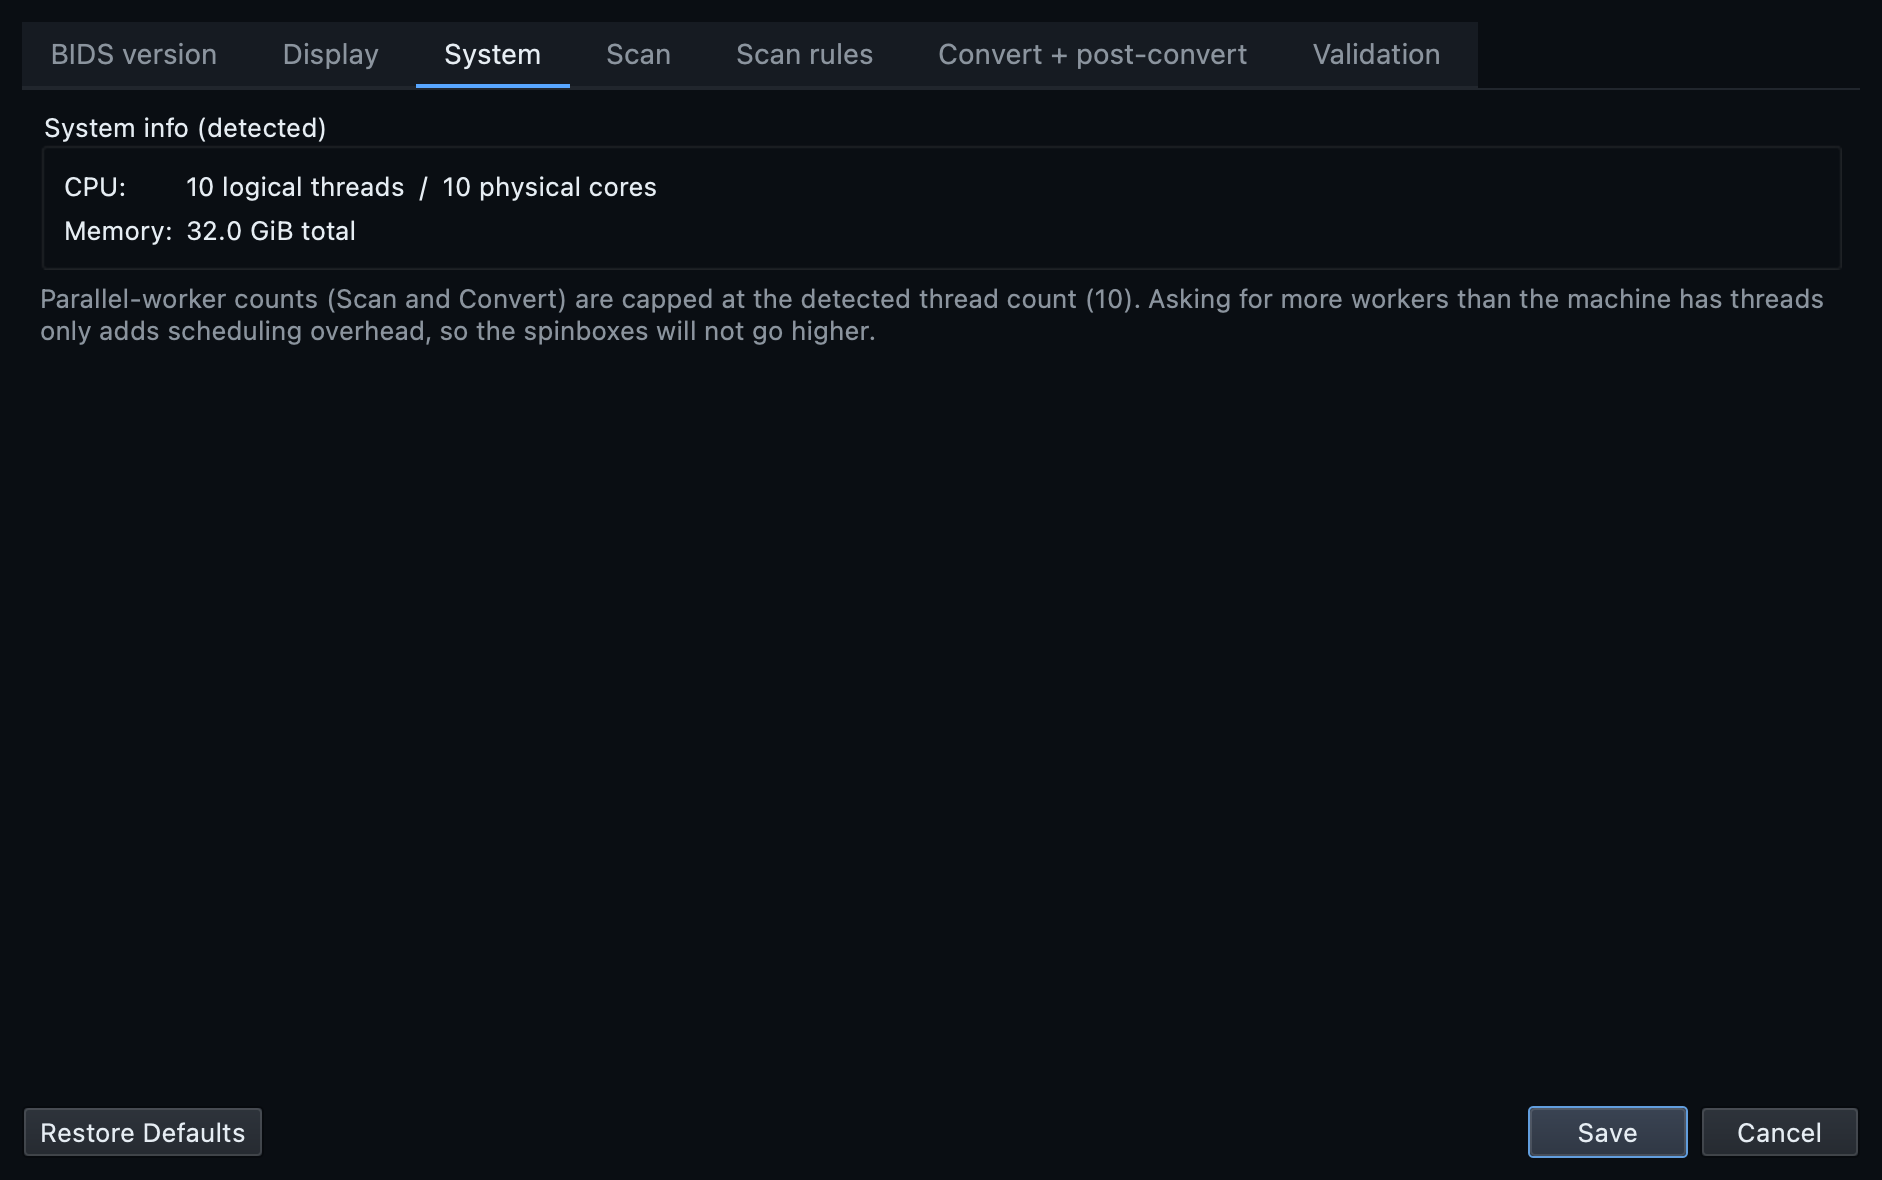
The System tab of the Settings dialog
What the application detected about your machine: logical threads, physical cores and total memory. It is read-only, and it is here because it sets the ceiling on the parallel-worker spinboxes in the Scan and Convert tabs. Asking for more workers than the machine has threads only adds scheduling overhead, so those controls will not go higher.

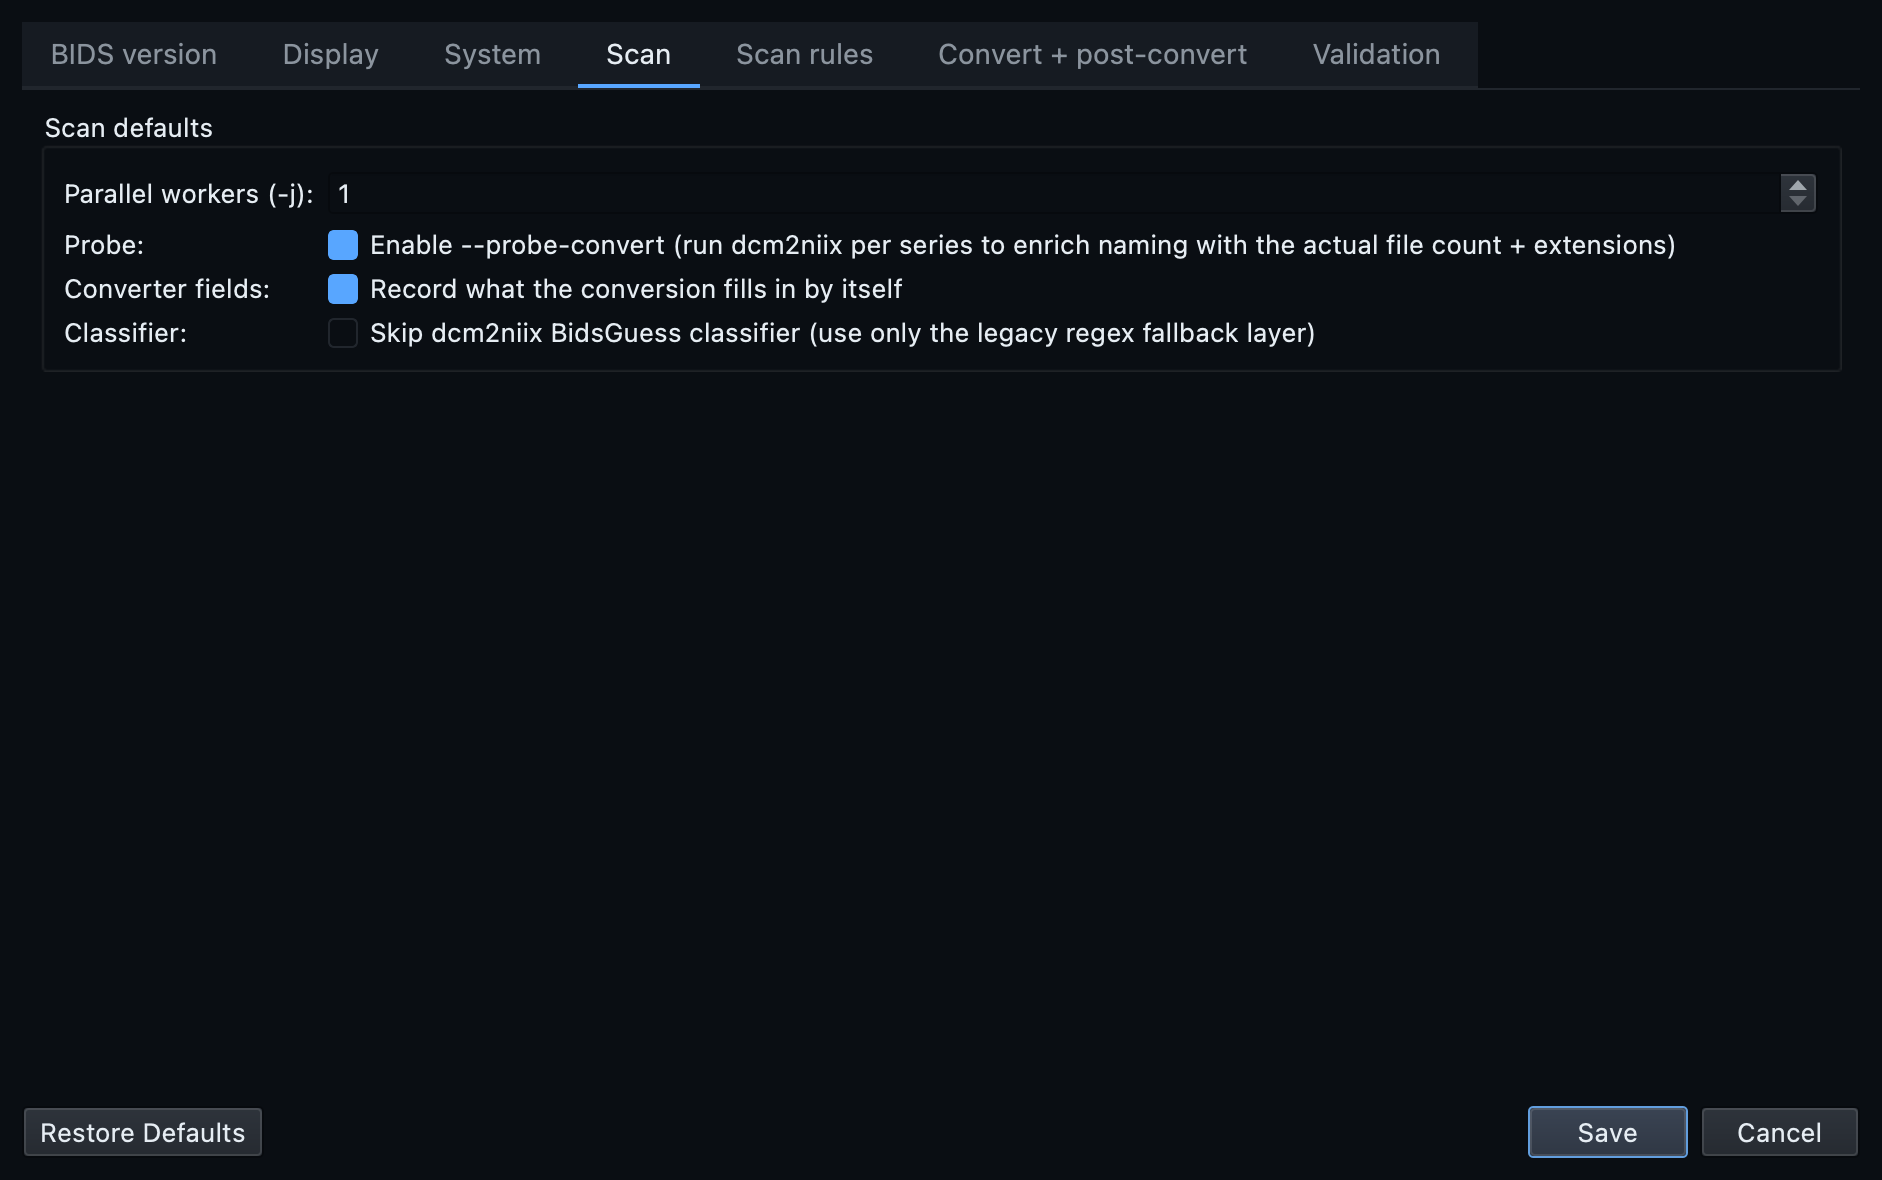
Scan

The Scan tab of the Settings dialog
How much of the work the scan does up front. Probe convert runs the converter once per series so the naming reflects the files that will actually be produced. Record what the conversion fills in by itself notes, per kind of file, the values the engines produce, so the metadata form can show them rather than ask you for something nobody has to answer. Both are on by default.

Scan rules

The Scan rules tab of the Settings dialog
Your site's own conventions, taught once. A hint forces any series whose name matches a pattern to a datatype, suffix and task you choose; an exclusion drops anything matching a name or path. Datatype and suffix come from the BIDS schema rather than free text, so a rule cannot produce an invalid combination. Hints apply to MRI and PET, which are classified from their sequence description; EEG and MEG are classified from their channel types instead, though a path-based exclusion still skips any modality. The command line reads the same rules through --rules-file.

Convert and post-convert

The Convert and post-convert tab of the Settings dialog
Two groups. Above, how the conversion runs: parallel workers, what to do when a subject already exists (Skip is the safe default and never loses data), whether to keep the residual single-volume duplicates dcm2niix splits off, and whether to re-encode EEG to EDF. Below, the chain that runs after every conversion, shown as an indented hierarchy: generate metadata, insert TODO placeholders, validate, deep checks, write an HTML report. All on by default, and each can be switched off.

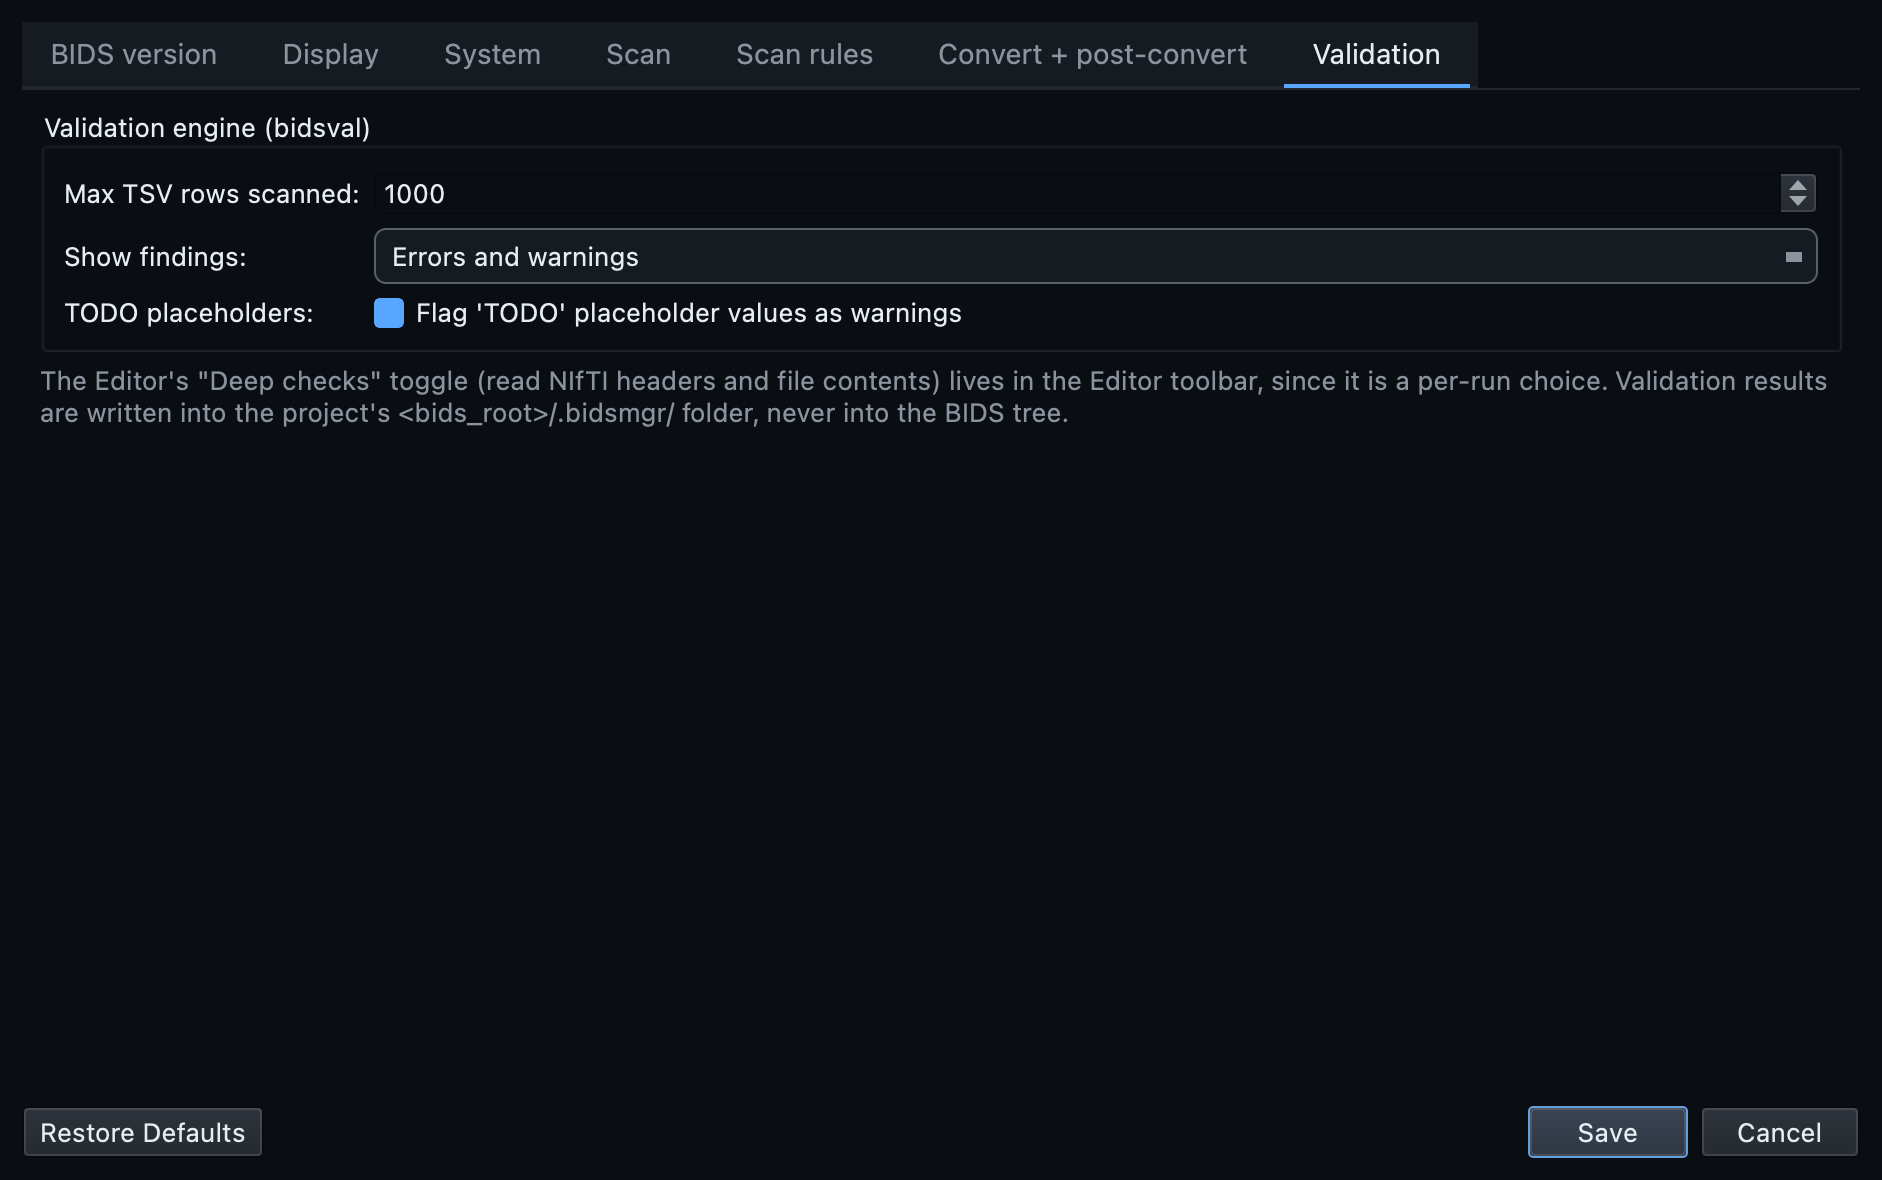
Validation

The Validation tab of the Settings dialog
How much validation does and how much of it you see. Max TSV rows scanned bounds how far into a long table the column and value checks read, which keeps validation fast on large datasets. Show findings filters the Validation pane to errors, warnings or both, so you can work errors first; the counts on the tree and the chips always show the full picture regardless. Flag TODO placeholder values is a BIDS Manager convention rather than part of the standard, on by default; turning it off gives counts identical to the standalone bidsval engine. The Deep checks toggle is not here: it is a per-run choice and lives in the Editor toolbar.